- Products
- Solutions
- Developers
- Support
- About
Example Website – We will be adding Global Address Complete to the shipping and billing address fields in the following sample web site:
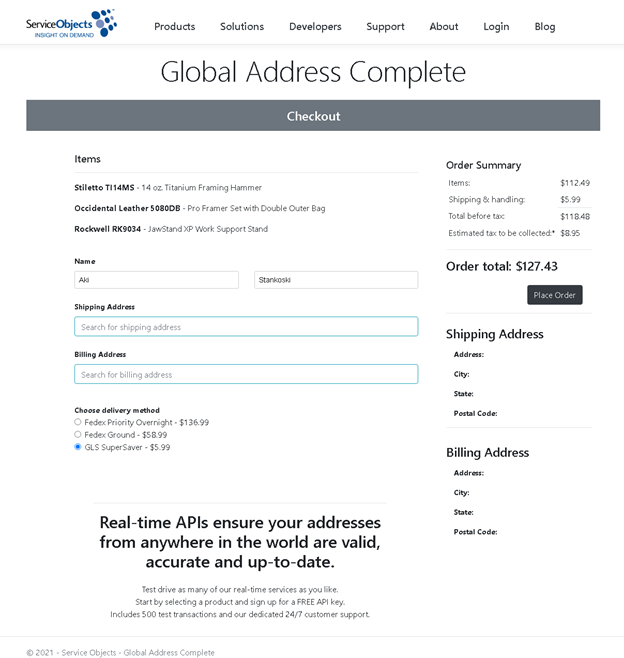
Input Fields – The input text fields are setup as search bars
@*Shipping and Billing Search Bars*@
<input type="search" id="iShippingAddress placeholder="Search for shipping address"/>
<input type="search" id="iBillingAddress" placeholder="Search for billing address"/>
The two input text fields will allow your end users to type in the beginning of an address and have potential address options recommended to them.
Billing and Shipping Fields – The output data will be mapped to these output labels
<h4>Billing Address</h4>
<label id="iBillingAddress1" placeholder="Address"></label>
<label id="iBillingLocality" placeholder="City"></label>
<label id="iBillingAdminArea" placeholder="State"></label>
<label id="iBillingPostalCode" placeholder="Postal Code"></label>

<h4>Shipping Address</h4>
<label id="iShippingAddress1" placeholder="Address"></label>
<label id="iShippingLocality" placeholder="City"></label>
<label id="iShippingAdminArea" placeholder="State"></label>
<label id="iShippingPostalCode" placeholder="Postal Code"></label>
Include Files – Add references to the CSS and JavaScript files
CSS
<head>
<link rel="stylesheet" type="text/css" href="https://trial.serviceobjects.com/Resources/AC/CSS/ACStyle.css" />
</head>
JavaScript
<body>

<script type="text/javascript" src="https://trial.serviceobjects.com/Resources/AC/JS/ACScriptV1.01.js"></script>

</body>
Field Mapping – Map the fields on your html page to the fields in the included JavaScript
<script>
var shippingFields = [
{ element: "iShippingAddress", field: "Address1", mode: so.fieldMode.SEARCH | so.fieldMode.POPULATE},
{ element: "iShippingAddress1", field: "Address1", mode: so.fieldMode.POPULATE },
{ element: "iShippingLocality", field: "Locality", mode: so.fieldMode.POPULATE },
{ element: "iShippingAdminArea", field: "AdminArea", mode: so.fieldMode.POPULATE },
{ element: "iShippingPostal", field: "PostalCode", mode: so.fieldMode.POPULATE }];

var billingFields = [
{ element: "iBillingAddress", field: "Address1", mode: so.fieldMode.SEARCH | so.fieldMode.POPULATE },
{ element: "iBillingAddress1", field: "Address1", mode: so.fieldMode.POPULATE },
{ element: "iBillingLocality", field: "Locality", mode: so.fieldMode.POPULATE },
{ element: "iBillingAdminArea", field: "AdminArea", mode: so.fieldMode.POPULATE },
{ element: "iBillingPostal", field: "PostalCode", mode: so.fieldMode.POPULATE }

</script>
The field mapping is nearly identical to a single-input integration with the only key difference being the second set of mapped fields.
Options – Within the same field mapping script tag, add your license key, options, and instantiate the two DOTSGlobalAddressComplete objects.
var CustomKey = "XXXXXXXXXXXXXXXXXXXXXXXXXXXXXXXX";
var options = { key: CustomKey, setBiasToIP: true };
var DOTSGlobalAddressCompleteShipping = new so.Address(shippingFields, options);
var DOTSGlobalAddressCompleteBilling = new so.Address(billingFields, options);
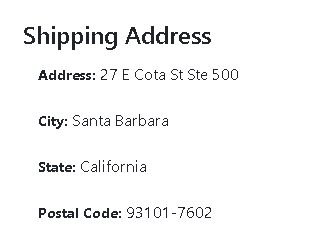
Shipping Input in Action – Selecting an address from the type-ahead bar will populate your individual shipping address fields:
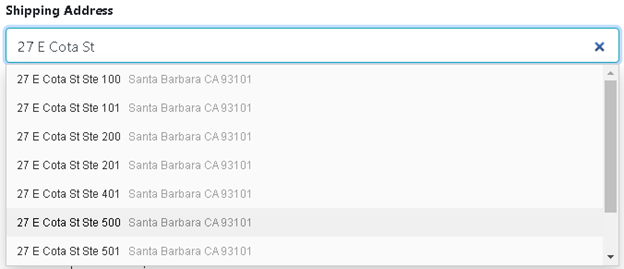
Upon selecting an address from the drop down, the mapped outputs are populated. For more information on what fields are mappable, visit our Developer Guide.
The Complete Package – Shipping and Billing address completion are in place after a few simple field mappings and object instantiations.

The use case example in this guide shows how you can implement the type-ahead functionality of our Global Address Complete web service in multiple places on a single web form, based on the coding guidelines from our quick integration guide. This example can be modified to suit your own business applications, and demonstrate how you can adapt this to your own web forms.
Finally, remember that our technical support is as close as a phone call or online request. Contact us anytime, and best of success with your own implementation!