
Databricks is a platform that facilitates data processing (typically big data) and analysis via distributed systems via Spark clusters. Users of Databricks are typically users that handle large volumes of data requiring data transformations and various data processing pipelines. The reason we built an integration in Databricks is to help keep client data as up-to-date and accurate as possible in these scenarios. Garbage-in is garbage-out and for clients performing data analysis activities or prepping data to train a machine learning model, having the best data possible will in enhance the usefulness of the results. In terms of ML, the difference between a successful and failed ML project can be due to even a small amount of bad data that skews training.
In this blog we run through how to set up calls to the Service Objects Address Validation 3 US API (AV3) product via a Databricks notebook. Roughly the same process will work with most of our other APIs except that endpoints will change, inputs and outputs will need to be adjusted for the specific API and license keys will need to be updated.
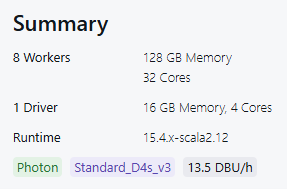
For this example, I created a multi-node cluster with a single user access mode consisting of 8 workers totaling 128 GM of memory and 32 cores. The driver had 16 GB of memory and 4 cores available. Both the driver and the workers used Standard_D4s_v3. I had my cluster terminate after 10 minutes of inactivity.
In my demo I created a data source from an address csv file that I uploaded manually into Databricks contain 200k addresses ready to be validated. But you can adapt this solution to use a variety of data sources in your pipeline.
Preprocessing data for validation doesn’t really require any work to be able to use the API. You can look for nulls and replace those but the code handles that by qualifying the inputs to the API. The only other thing to consider is that API calls to AV3 have a couple of minimum requirements to make a good call to the service with respect to the fields required. The inputs to the service are BusinessName, Address, Address2, City, State, PostalCode and LicenseKey, but you don’t need all of these to make a successful API call to the service. At minimum, you will need to send the API either the address, city, state or the address and postal code. The more data points you can send the better but those are the minimum requirements. In any case, and it should be obvious, you need to provide a license key to access the API in a trial or production scenario.
Now let’s step through the code.
First, we start with the imports.
import json
from pyspark.sql.types import StringType
import requests
from concurrent.futures import ThreadPoolExecutor, as_completed
The json import will help with parsing the AV3 JSON response. StringType is needed to help expand the schema of the RRD, requests will help with setting up and executing the API calls and ThreadPoolExecutor, as_completed are used to help efficiently make the calls to the API in parallel.
Now, we will load the dataset.
df = spark.table("default.databricks_demo")
df = df.repartition(5)
The variable df is a Spark Dataframe which is a distributed table abstraction over the cluster’s data with lazy evaluation. We set the partitions to 5 and as you will see later we set max_workers to 10 creating a 50 transactions per second (tps) scenario. You will want to adjust this value for your needs. The combination of max_workers multiplied by the partitions should equal around 100 tps to be safe. So, with 10 max_workers that would be a partition of 10 as well.
Next, we will define a couple of functions to facilitate the call to the API.
def process_partition(rows):
This function is designed to process each row in the dataframe and the first thing we want to do is to set up the endpoints to the service operation. In our demo, we are calling the GetBestMatches operation of the AV3 API.
# primary_url = "https://trial.serviceobjects.com/AV3/api.svc/GetBestMatchesJson"
# backup_url = "https://trial.serviceobjects.com/AV3/api.svc/GetBestMatchesJson"
primary_url = "https://sws.serviceobjects.com/AV3/api.svc/GetBestMatchesJson"
backup_url = "https://swsbackup.serviceobjects.com/AV3/api.svc/GetBestMatchesJson"
In a production scenario, which is the uncommented lines of code above, you will want to set up one endpoint to hit the production environment and another to hit the backup environment. Using both will help ensure five 9’s of uptime. In a trial scenario, we set both endpoints to the same trial environment and we do keep both as a reminder that once in production you will want to have the production versions updated for each.
Now we set the timeout to 10 seconds.
timeout_seconds = 10
Depending on your environment and needs, you will want to experiment here as well.
Creating the session object here will allow us to reuse the TCP connections, instead of opening and closing a connection for each API call.
session = requests.Session()
Now, we will create the list from the iterator so we can use threading.
rows_list = list(rows)
The way we process each individual row is through the process_row function.
def process_row(row):
Inside this function we start by mapping the row variables to the inputs expected by the API.
params = {
	"BusinessName": row.BusinessName or "",
	"Address": row.Address or "",
	# "Address2": row.Address2 or "",
	"City": row.City or "",
	"State": row.State or "",
	"PostalCode": row.PostalCode or "",
	"LicenseKey": "XXXX-XXXX-XXXX"
}
You’ll notice a couple of things here. First, Address2 is commented out and not being used. As I mentioned earlier, not all fields are needed to run the validation and, in this case, my data set didn’t have address two data to pass to the API. Second, you’ll need to replace the value for LicenseKey for what you have. The License key to use would be your trial key if calling the trial endpoint or the production key if you are calling the production endpoints. These values are added to the params variable which will be used when setting up the call to the API.
When trying to keep track about knowing when to call the failover endpoint (the backup endpoint) I use the variable backup_attempt and initialize it to False, so once it is tripped the variable will be se to True and the failover call will be executed on the backup endpoint.
backup_attempt = False
Inside the try/catch block we call the API with the URL endpoints, the input parameters to the API call and the timeout value. Depending on the response, the code flow can switch to calling the backup URL or return the API response. If you hit the first exception, you’ll then see that the failover endpoint is called and a second exception leads to an error response.
response = session.get(primary_url, params=params, timeout=timeout_seconds)
if response.status_code == 200:
If you get a status response code of 200, it doesn’t mean that all is good with the input address. It just means that the call to the API was successful. From there, you still need to evaluate the response from the service. What you are looking for here is to see if an error response was returned from the service.
if "Error" in av3_result and "TypeCode" in av3_result["Error"] and av3_result["Error"] == "3":
We are not looking for just any error, what we are checking for is an error scenario that should cause you to retry the API call on the backup endpoint or not. In the case of AV3, Error type code of 3 is what should set you down that path. Error type code 3 indicates a Service Objects Fatal error and suggests something is wrong with that endpoint specifically. This is super rare but still necessary to endure five 9’s of uptime. More about AV3 errors can be found here.
If there are no errors causing a failover API call, then the response will be processed. We use the process_response function to do just that.
def process_response(response, av3_result):
In this method, we get the JSON from the response and map the returning values into the expected order and format needed by the schema this data will land in. You’ll see that structure shortly. The JSON will be parsed into either a validation error output or a successful validation output.
Back outside of the process_response and process_row functions, we use the rows_list variable we created earlier and loop through each row using max_workers of 10 to run the rows in parallel and append the result to the results array.
results = []
with ThreadPoolExecutor(max_workers=10) as executor:
	futures = [executor.submit(process_row, row) for row in rows_list]
	for future in as_completed(futures):
		results.append(future.result())
Before we call process_partition from mapPartitions we add the validation fields and error fields to the schema that will be added to the dataframe.
new_schema = df.schema\
.add("IN-OUT", StringType(), True)\
.add("Address1", StringType(), True)\
.add("Address2", StringType(), True)\
.add("CityName", StringType(), True)\
.add("StateName", StringType(), True)\
.add("ZIPCode", StringType(), True)\
.add("IsResidential", StringType(), True)\
.add("DPV", StringType(), True)\
.add("DPVDesc", StringType(), True)\
.add("DPVNotes", StringType(), True)\
.add("DPVNotesDesc", StringType(), True)\
.add("Corrections", StringType(), True)\
.add("CorrectionsDesc", StringType(), True)\
.add("BarcodeDigits", StringType(), True)\
.add("CarrierRoute", StringType(), True)\
.add("CongressCode", StringType(), True)\
.add("CountyCode", StringType(), True)\
.add("CountyName", StringType(), True)\
.add("FragmentHouse", StringType(), True)\
.add("FragmentPreDir", StringType(), True)\
.add("FragmentStreet", StringType(), True)\
.add("FragmentSuffix", StringType(), True)\
.add("FragmentPostDir", StringType(), True)\
.add("FragmentUnit", StringType(), True)\
.add("Fragment", StringType(), True)\
.add("FragmentPMBPrefix", StringType(), True)\
.add("FragmentPMBNumber", StringType(), True)\
.add("ErrorType", StringType(), True)\
.add("ErrorTypeCode", StringType(), True)\
.add("ErrorDesc", StringType(), True)\
.add("ErrorDescCode", StringType(), True)\
.add("IsCASS", StringType(), True)
Now, we call process_partition to process the rows and then add the schema to the dataframe.
rdd_with_av3 = df.rdd.mapPartitions(process_partition)
df_with_av3 = spark.createDataFrame(rdd_with_av3, schema=new_schema)
From there we save the results. In this demo we coalesce the data and save it off to a parquet format. You may choose to save or move that data to other formats or locations.
df_with_av3.coalesce(1).write.mode("overwrite").format("parquet").save("/mnt/service_objects_storage/validated_US_addresses_200k")
That completes the walkthrough of the notebook. Using this code and adding it to your data pipelines will help ensure every piece of address data you have is up to date and as accurate as possible. When it comes to having data that is actionable, accurate data is paramount. Even more so in terms of machine learning, where even small amounts of inaccuracies can skew performance. In this solution, the main consideration you should have is to make sure you store all of the results from the API somewhere (you don’t want to have to revalidate records because the validation results data didn’t persist), be careful of how many max_workers count and the partition count in order not to exceed roughly 100 tps.
Click here for full code download.