
Organizations often migrate data from one system to another for any number of reasons. These migrations also present an opportunity to improve data quality with steps such as data cleansing or validation, to take advantage of them as a break from normal business operations. This article will look at the specifics of how to do this, using our APIs within Microsoft’s SQL Server Integration Services,
Microsoft SQL Server Integration Services (SSIS) is a tool for data migration and integration that can be used to build Extract, Transform and Load (ETL) processes. In this integration blog, we will show you how to set up a simple process that takes address data from one source, validates it against our Address Validation US – 3 API, and pushes the results to a destination.
While this example is using address validation as a case study, many of our other data validation services can be used in the same way (e.g. email validation, phone validation, lead validation, geocoding and more). In this example, we will be pulling data from one table in SQL Server to another table in SQL Server.
Keep in mind that are many different source/destination combinations that can be used. This process is well defined in many examples on the web, here we will focus on how to call our Address Validation US – 3 API. Many parts of this process are not supported out of the box in SSIS.
To follow along with this walkthrough, you can use these two tables in SQL Server, Address.sql and SimpleAV3Result.sql. This SQL will then generate the tables.
Step 1. Create a New SSIS Package
To get started, open Visual Studio and create a new Integration Services Project. Then, add a new SSIS package to the project.
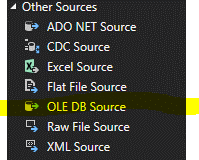
Step 2. Add OLE DB Source Component
Many types of sources are available and will work. Drag an OLE DB Source component from the SSIS Toolbox to the Data Flow design surface. (Be sure to do this on the Data Flow tab and not the Control Flow.) Configure it to connect to the Address table.
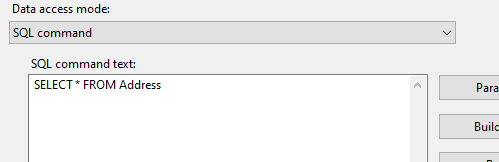
Besides setting up the connection to the DB, you will want to set the Data access mode. In this example, we chose SQL command and set the SQL command text to select all the addresses from the Address table. In this simple example, we will pull records from this table and not do anything else there.
In a more realistic situation, you will want to track which records have already been validated, which can be determined by adding a date/time column to the table. A date/time column would be preferable over a Boolean flag here, so you can know when the last time a record was validated in the event you want to periodically revalidate records. When it comes to Address Validation US – 3, the date/time column is less necessary than our API for Email Validation or Lead Validation.
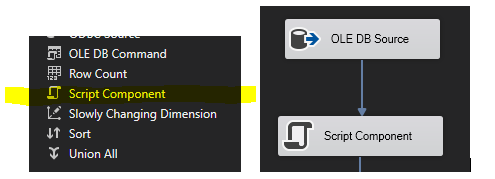
Step 3. Add Script Component
Drag a Script Component (Transformation) from the SSIS Toolbox to the Data Flow design surface. Connect the output of the OLE DB Source component to the Script Component.
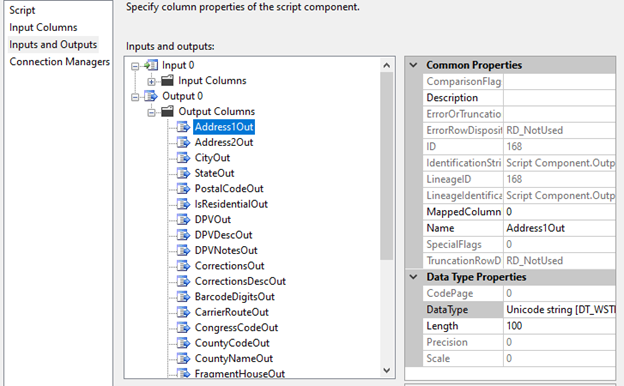
Double-click on the Script Component to open the Script Transformation Editor. Choose Inputs and Outputs in the left pane and define the output columns matching the same data type and lengths as in the SQL table SimpleAV3Result.
In our solution we are using strings for almost everything, so use the Unicode string [DT_WSTR] data type for the strings. The IsCassOut field should be a Boolean data type. For clarity when writing the code, we appended “Out” to the end of the output column names. Also, the listed data points match the output response from the service.

Step 4. Add Address Validation Code to the Script
After defining the output columns, choose Script in the left pane. Click on “Edit Script…” button to open the Script Editor. This will open another Visual Studio instance tied directly to this project calling the solution that is generated “VstaProjects”. You will write your code in the main.cs page that is generated.
Also generated are a few methods in main.cs called PreExecute, PostExecute and Input0_ProcessInputRow and are described in the comments of the code. Depending on what your business logic is, you may add code to any one of these methods, but for this demonstration we are merely trying to run address validation on each row in the earlier query that gets the records from the Address table, so we will be using the Input0_ProcessInputRow method.
Step 4.1. Add References
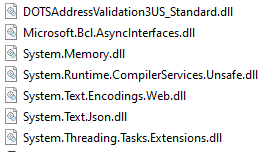
This is usually a simple step. We initially started by adding our DOTSAddressValidation3US_Standard NuGet Package to the solution. Because SSIS does not support this, when you add a package or a reference it gets removed when you save and leave the script and come back. The way to get around this is to add the necessary DLLs to the Global Assembly Cache (GAC).
This may sound involved, but in fact the process is rather simple. First, gather all the DLLs that didn’t stick around. We do this by installing our DOTSAddressValidation3US_Standard NuGet Package to the solution, leaving, and then coming back to see which libraries SSIS purged. The reference section in your solution will show warnings for all the DLLs that have been removed, and these are the ones that we had to add to the GAC:

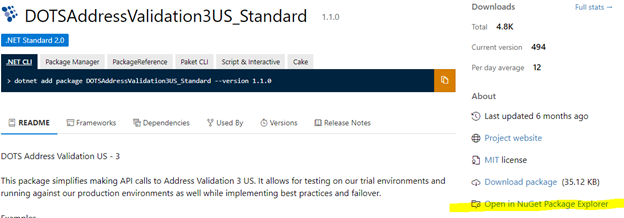
To get the DDls in the first place, go to www.nuget.org and search the library. Once this was found, we selected “Open in NuGet Package Explorer”. From there we were able to navigate to the DLL that we were looking for:
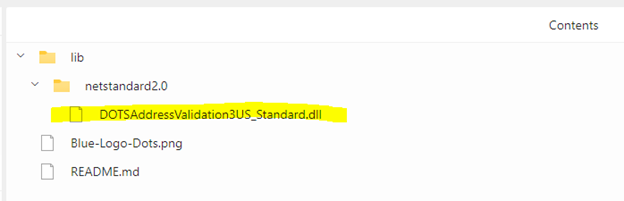

We did this for all of the missing references. From there, we followed any of the instructions online on how to add a DLL to the GAC. Here is just one example of how to do it.
Step 4.2. Let’s Write the Code
In the Input0_ProcessInputRow method, we add the following line of code:
AV3_GBM_Response BestMatchResponseLive = DOTSAV3.GetBestMatches(" ", Row.Address1, Row.Address2, Row.City, Row.State, Row.PostalCode, "XXXX-XXXX-XXXX", true);
The call to this method will handle running the validation against the trial or production environment via the last parameter in the list. Here we have it set to true, meaning we will be using the production environment.
The second last parameter is the license key for the service. Note that production and trial environments use different license keys, so a trial key will not work in production and vice versa. The first six parameters are for the address in question, and their definitions can be read here. The Input0_ProcessInputRow method has an input parameter called Row of the type Input0Buffer, which will contain a single row from the query. This is how you will access the data points to validate (i.e. Row.Address1, Row.Address2, …).
The call to DOTSAV3.GetBestMatches implements calls to our API using best practices and failover, so our clients don’t need to think about the best way to integrate our endpoints – it’s all already wrapped up for you in the functionality of the method.
When the method returns from validation we’ll need to evaluate if there was an error and handle it. In this simple example we use an “if” statement that checks for a null value on the error field. If there is an error, we will insert the error into the DB, otherwise we will insert the validation.
if(BestMatchResponseLive.Error == null )

{

}

else

{

}
Going down the path where there isn’t an error, we will want to update all of our “Out” columns defined in step 3 with the validated data points:
Row.Address1Out = BestMatchResponseLive.Addresses[0].Address1;
Row.Address2Out = BestMatchResponseLive.Addresses[0].Address2;
Row.CityOut = BestMatchResponseLive.Addresses[0].City;
Row.StateOut = BestMatchResponseLive.Addresses[0].State;
Row.PostalCodeOut = BestMatchResponseLive.Addresses[0].Zip;
Row.IsResidentialOut = BestMatchResponseLive.Addresses[0].IsResidential;
Row.DPVOut = BestMatchResponseLive.Addresses[0].DPV;
Row.DPVDescOut = BestMatchResponseLive.Addresses[0].DPVDesc;
Row.DPVNotesOut = BestMatchResponseLive.Addresses[0].DPVNotes;
Row.CorrectionsOut = BestMatchResponseLive.Addresses[0].Corrections;
Row.CorrectionsDescOut = BestMatchResponseLive.Addresses[0].CorrectionsDesc;
Row.BarcodeDigitsOut = BestMatchResponseLive.Addresses[0].BarcodeDigits;
Row.CarrierRouteOut = BestMatchResponseLive.Addresses[0].CarrierRoute;
Row.CongressCodeOut = BestMatchResponseLive.Addresses[0].CongressCode;
Row.CountyCodeOut = BestMatchResponseLive.Addresses[0].CountyCode;
Row.CountyNameOut = BestMatchResponseLive.Addresses[0].CountyName;
Row.FragmentHouseOut = BestMatchResponseLive.Addresses[0].FragmentHouse;
Row.FragmentPreDirOut = BestMatchResponseLive.Addresses[0].FragmentPreDir;
Row.FragmentStreetOut = BestMatchResponseLive.Addresses[0].FragmentStreet;
Row.FragmentSuffixOut = BestMatchResponseLive.Addresses[0].FragmentSuffix;
Row.FragmentPostDirOut = BestMatchResponseLive.Addresses[0].FragmentPostDir;
Row.FragmentUnitOut = BestMatchResponseLive.Addresses[0].FragmentUnit;
Row.Fragment = BestMatchResponseLive.Addresses[0].Fragment;
Row.FragmentPMBPrefixOut = BestMatchResponseLive.Addresses[0].FragmentPMBPrefix;
Row.FragmentPMBNumberOut = BestMatchResponseLive.Addresses[0].FragmentPMBNumber;
Row.IsCassOut = BestMatchResponseLive.IsCASS;
In the case of an error, for simplicity’s sake we will combine all of the error details into a single string and add that to the Error “Out” column:
Row.ErrorOut = "TypeCode:" + BestMatchResponseLive.Error.TypeCode +
               ";TypeDesc:" + BestMatchResponseLive.Error.Type +
               ";DescCode:" + BestMatchResponseLive.Error.DescCode +
               ";Desc:" + BestMatchResponseLive.Error.Desc;
And that’s it for the code. Again, this is a simple example, and there is plenty more that can be done in this section, but it really just depends on your use case and business logic.
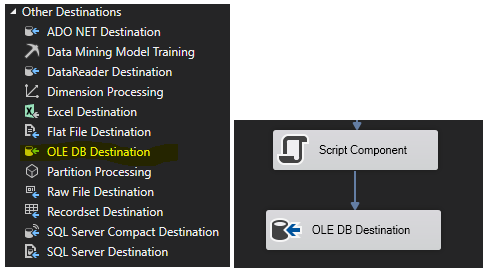
Step 5. Add OLE DB Destination Component
As with Step 2, many different types of destinations are available and will work. For example, you can drag an OLE DB Destination component from the SSIS Toolbox to the Data Flow design surface, and connect the output of the Script Component to the OLE DB Destination component.
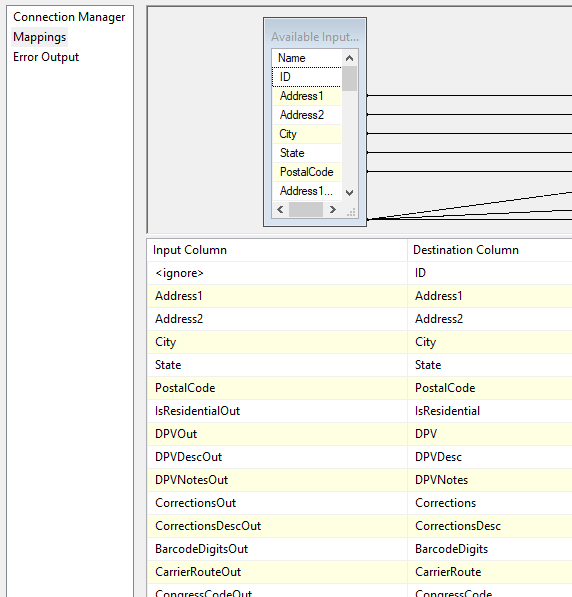
Next, configure the OLE DB Destination component to connect to the SimpleAV3Result table in your database, then map the “Out” columns from the Script component to the corresponding columns in the destination table like this:
Step 6. Run the SSIS Package to Validate Addresses
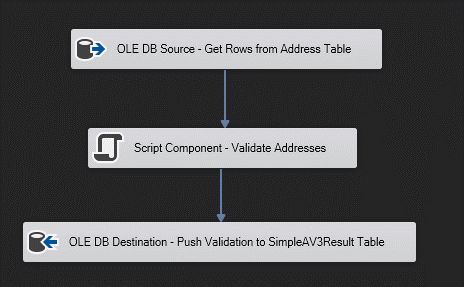
Save your SSIS package and then run it. It will execute the data flow tasks by pulling rows from the source, validating the addresses against our Address Validation US 3 web API, and then push the results to the destination table. Here is what the final flow looks like:
There you have it. It is actually very simple to use SSIS and call Service Objects APIs, as this example can work with any number of our APIs in between many different sources and destinations. Finally, as always, our technical support team is always happy to assist you in developing these interfaces – contact us anytime.