The reality about any set of residential customer data is that given enough time, addresses and the people living there are bound to change. Occasionally, businesses and organizations can rely on the customer to notify them of changing addresses but when people move, this often times falls to the wayside on the list of priorities.
For cases like these, accessing the USPS National Change of Address database can provide a helpful solution to ensure that mail gets delivered to the correct person. The USPS maintains a large data set of address forwarding notifications, and with the DOTS NCOA Live service, this information is right at your finger tips.
Our DOTS NCOA Live service is a bit different than the rest of our products. Most of our other products process validation requests in a one at a time manner. NCOA is a little different in that in order to start a request, a minimum list of 100 addresses must be sent to the service, and from there anywhere from 1 to 500 records can be processed at a time. To show you how it works, we’ve put together a quick step by step tutorial.
What You Will Need
- C# experience
- Visual Studio ( VS 2015 is used for this example)
- A DOTS NCOA Live license Key. A free Trial Key can be obtained here.
Project Creation and Setup
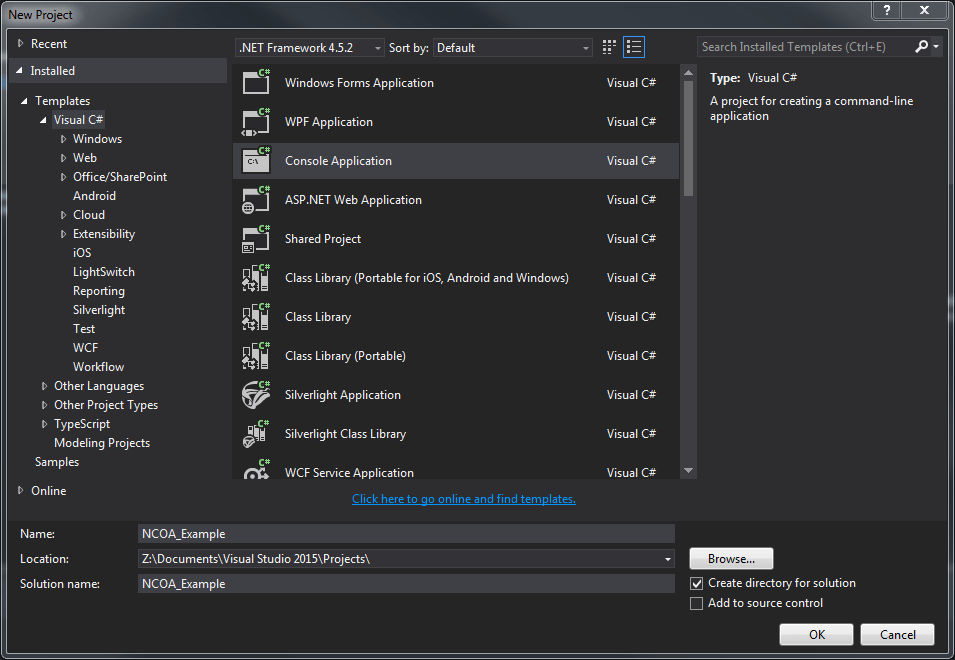
To get started, go ahead and launch Visual Studio and select File->New->Project. From here you can choose whatever project will meet your needs. For this example, we’ll be creating a very basic console application. So if you want to follow along step by step, you can choose the same project details as shown below.
Select OK and wait for Visual Studio to finish creating the project. Once that is done, right click the project, select Add and then select Service Reference. Here, we’ll enter the URL to the WSDL so that Visual Studio will create all the necessary classes, objects and methods that we’ll use when interacting with the DOTS NCOA Live service. To successfully do this, add the necessary information into the pop up screen as shown in the screenshot below.

Select OK. Now that the service reference is successfully set, open up the App.Config. Below is a screenshot of the App.Config that has been modified.
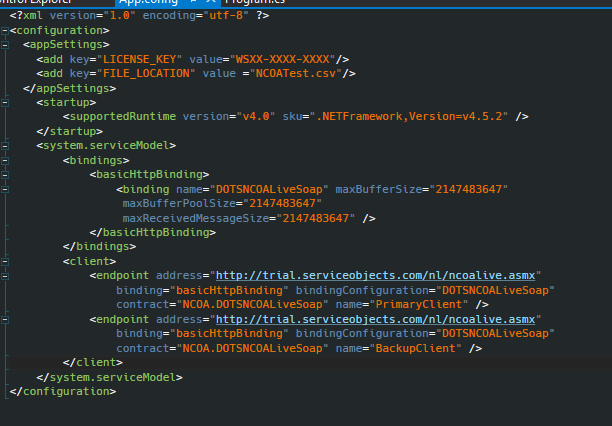
We’ve added the appSettings section and within that we’ve added two key value pairs. The first is the license key field where you will enter your key. Storing the license key in the app or web config files can be helpful and easy when transitioning from a trial to a live environment in your application. When you are ready to use a production key, changing it in the app config is an easier option than having to change a hard coded license key.
We’ve also put the path to a csv that will contain the address and name information that we will be sending to the NCOA service. You may not want to read in a CSV for your application but the process of building the input elements for the service will be relatively similar. For this example, we’re just going to put the file in the BIN folder of our project, but you can add any path you want to the file.
We’ve also increased the maximum buffer size in the http Binding. Since we’ll be sending a list of 100 addresses to the DOTS NCOA Live service, we’ll indeed need to increase the buffer size.
Lastly, we’ve changed the name of the original endpoint to “PrimaryClient,” made a copy of the endpoint and changed that name to “BackupPoint.” Currently, both of these endpoints point to the trial Service Objects environment, but when a production key is purchased, the PrimaryClient url should point to http://sws.serviceobjects.com/nl/ncoalive.asmx and the BackupClient should point to http://swsbackup.serviceobjects.com/nl/ncoalive.asmx.
Calling the DOTS NCOA Live web service
The first thing we’ll do is instantiate two static strings outside of the Main method. One will be for the input file, and the other will be for the license key that we’ve placed in the app.config. Inside the scope of the Main method, we’ll instantiate a NCOAAddressResponse object called response and set it equal to null. We’ll also create a string called jobID and set that equal to null as well. This jobID will be passed as a parameter to our NCOA service call. A JobID can be seen as a unique identifier for all the records that are run against the service.

Now we’ll create the following method that will read our input file.
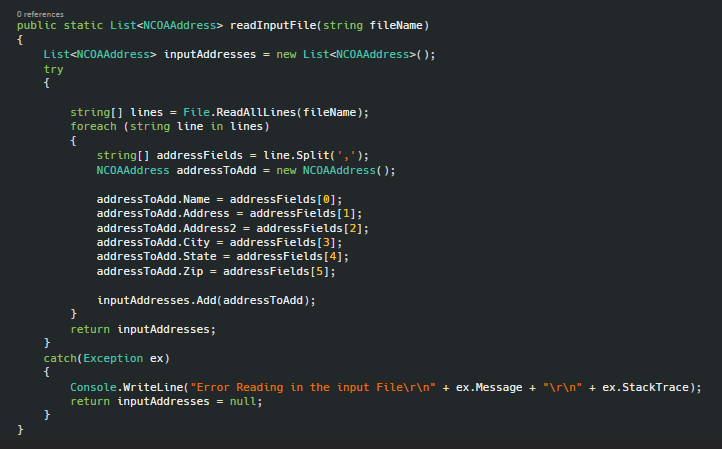
This method will return a List of the NCOAAddress object that will have all the inputs we need to send to the service. In my particular file the fields are as follows: Name, Address, Address2, City, State, Zip. Your code will need to be modified to read the specific structure of your input file. This code reads in the file and then loops through each of the lines and adds the appropriate values to the fields of the NCOA address object. After the line is successfully read, we add the individual NCOAAddress objet to the list called inputAddresses and then return that object once the code has finished looping through the file.
Now we’ll insert a try catch block into the main method. Within this try catch block we’ll create a List of the NCOAAddress object and call the readInputFile method to fill it. We’ll also make a JobID with today’s date appended to the end of it. You will likely want to customize your job id to fit into your business application. Jobs close on Sunday at 11:55 PM so that is also something to take into consideration when designing your code.

Failover Configuration
Now that we have all our inputs successfully set up, we are able to call the NCOA web service. The first step we’ll take is create another try catch block to make the web service calls in. We will also create an instance of the DOTSNCOALibraryClient and pass in the trip “PrimaryClient” as a parameter. This will ensure that our first call to the NCOA service will point to our primary URL that we have defined in the web config. Next we’ll make the call to the webservice using the library client and set it equal to our response object.
After we get a response back from the service we’ll perform our failover check. We check if the response is null or if an error TypeCode of 3 was returned from the service. An error type code of 3 would indicate that a fatal error occurred with the service. If either of these criteria are met, then we’ll throw an exception that will be caught by the catch block we have created. Within this catch block we’ll set the library client object to a new instance with the “BackupClient” string passed to it to ensure that we call the backup client. The code should look like the following.

This failover logic will ensure that your application stays up and running in the event that a Service Objects web service is unresponsive or in the event that it is not behaving as expected.
Processing the Response
Now that we have successfully called the service, we’ll need to do something with the response. In this tutorial, we’ll take the results from the service and download them as a CSV into our bin folder.
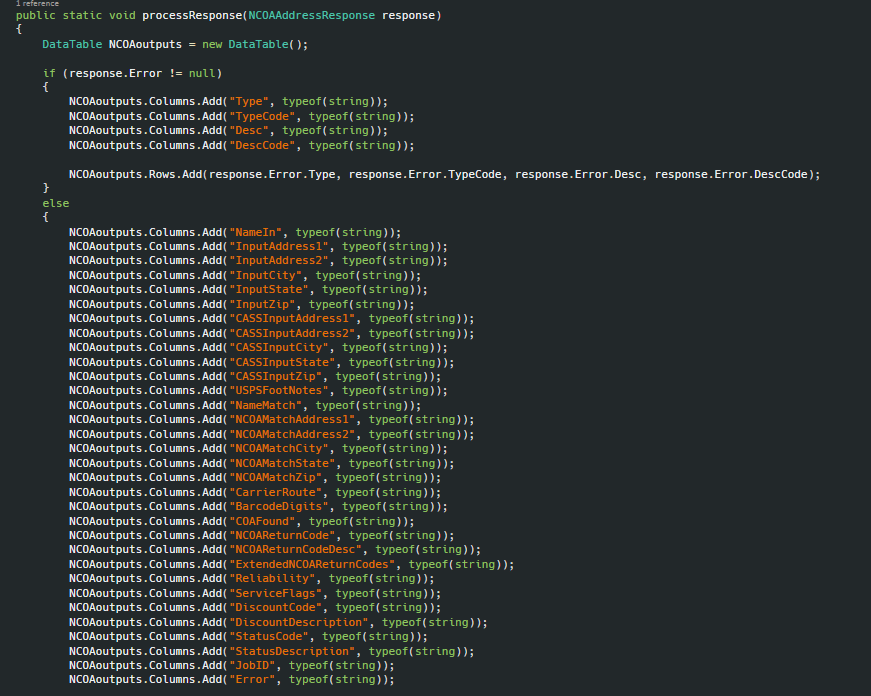
To do this, we will call and create a method called processResponse that will take a NCOAAddressResponse as an input. This method will take the outputs from the service and build a DataTable that we will use to eventually turn into a CSV. This can be done as shown in the following screen shot.
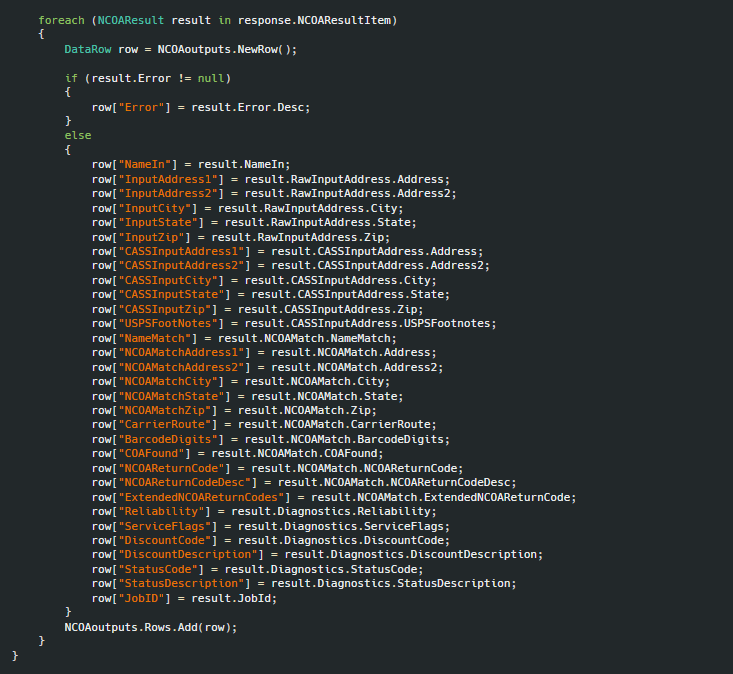
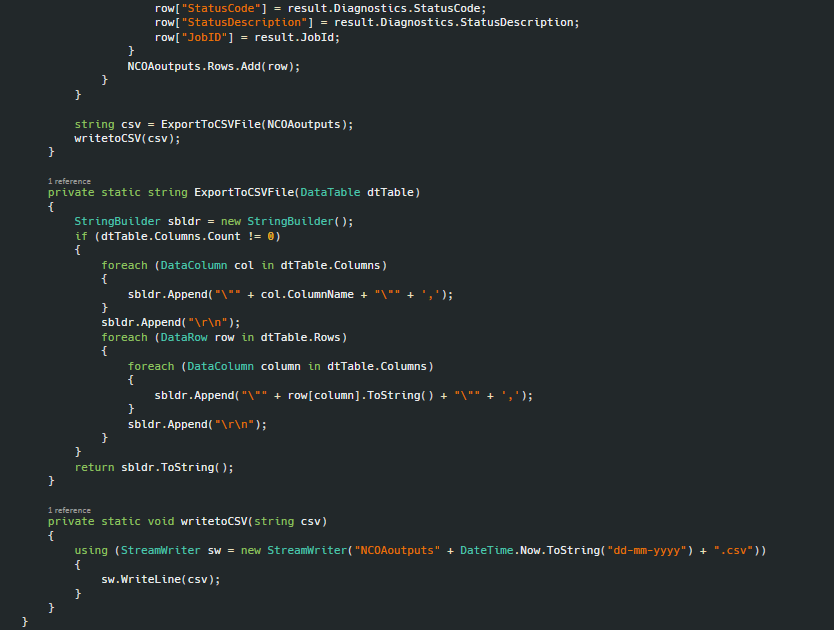
Now that our output data table has been created, we’ll call and create two methods will loop through our DataTable and convert it to a CSV string, and then write that CSV to the bin folder. The code to perform this is shown below.
More information on all the elements in the response object can be found on our developer guide for the NCOA service.
Now that our output data table has been created, we’ll call and create two methods will loop through our Data Table and convert it to a CSV string, and then write that CSV to the bin folder. The code to perform this is shown below.
Now our code is ready to run and the service is ready to test.
We’re always available for assistance, so be sure to contact us with any questions about integration for NCOA or any of our other services.