With Salesforce being the dominant platform in the Customer Relationship Management (CRM) universe, we are excited to demonstrate how our tools can benefit the data quality of your contact data in this robust system. Salesforce is highly customizable and one of the great things about it is that you don’t need to be a developer to create a rich user experience on the system. Although, being a developer, will help with understanding some of the coding concepts involved with some of the components. With all the data in your organization don’t you want it to be clean, accurate, and as monetizable as possible? The Service Objects suite of validation API tools are here to help you achieve those goals. Our tools make your data better so you can gain deeper insights, make better decisions and achieve better results.
This blog will demonstrate various ways that a Salesforce administrator or developer can boost the quality of their data. We will look into various flows, triggers, classes, Visualforce components, and Lightning components, and more as we demonstrate the ease of integration and the power of our tools in this series.
To get started, we will focus on demonstrating an Apex trigger with a future class. I will show you the code, part by part, and discuss how it all fits together and why. You will also learn how to create an Apex trigger, if you didn’t already know.
Apex triggers allow you to react to changes on a Salesforce object. For our purposes, those objects will typically be objects that have some kind of contact information like a name, address, email or phone, IP, etc. Additionally, the objects can contain various combinations of these as well. In this example, we will use the Contact Salesforce object and specifically the mailing address fields, though the Account object would have made just as much sense to demo. Service Objects has services for validating United States, Canadian and international addresses. In this example, I am going to use our US address validation API.
We are going to design this trigger to work with both a single Contact insert and bulk Contact inserts. This trigger will have two parts: the Apex trigger and an Apex future class. We will use the trigger to gather all of the Contact Ids being inserted and the future class will process them with a web service call to our address validation API.
It is important to note a couple things about the future class method and why it is used. First, using a future call tells the platform to wait and process the method at the next convenient time for the platform. Remember that Salesforce is a multi-tenanted platform, meaning organizations on the platform share, among others, processing resources. With that in mind, the platform tries to govern processing so that everyone on the platform gets the same experience and not one organization can monopolize the system resources. Typically, the future calls get initiated very quickly but there are no guarantees on timing but you can be sure that the future method will process soon after calling it. Second, callouts to a web service cannot be executed within a trigger, so the future method acts more like a proxy for the functionality. There are plenty more details and ways that a web service can be called and you can dive deep into the topic by going through the Salesforce documentation. If for no other reason, it forces you to separate the call to the web service from your trigger, in turn, exposing your future call to other code you may want to write.
Once we are finished the trigger and the future class, we will test out the functionality and then you will have some working code ready to deploy from your sandbox or development edition to your live org. But wait, don’t forget to write those unit tests and get over 75% coverage…Shoot for 100%. If you don’t know what I am talking about with unit tests I suggest you review that documentation on Salesforce.
The results of the future method will update mailing address fields and custom fields on the Contact object. For this example, here are the fields you will need to create and their respective data types. We will not need these until we get to the future method but it is a good idea to get them created and out of the way first.
- Field name
- Internal Salesforce name
- Type
- Service Objects field name
- dotsAddrVal_DPVScore
- AddrValDPVScore__c
- Number(1, 0)
- DPV
- dotsAddrVal_DPVDescription
- AddrValDPVDescription__c
- Text(110)
- DPVNotesDesc
- dotsAddrVal_DPVNotes
- AddrValDPVNotes__c
- Long Text Area(3000)
- DPVNotesDesc
- dotsAddrVal_IsResidential
- AddrValIsResidential__c
- Checkbox
- IsResidential
- dotsAddrVal_ErrorDescription
- AddrValErrorDescription__c
- Long Text Area(3000)
- Desc
- dotsAddrVal_ErrorType
- AddrValErrorType__c
- Text(35)
- Type
The last thing we will need to setup before we get started is registering the Service Objects’ endpoint with Salesforce so that we can make the web service calls to the address validation API. The page to add the URL to is called “Remote Site Settings” and can be found in Home->Settings->Security->Remote Site Settings. This is the line I added for this blog.

Be aware that this will only work for trial keys. With a live/production key you will want to add one for sws.serviceobjects.com and swsbackup.serviceobjects.com. You’ll want both endpoints with a live key and we’ll explain more about that later. We named this one ServiceObjectsAV3 but you can name it whatever you want.
Let’s get started with the trigger code. The first thing needed is to setup the standard signature of the call.
![]()
The method will be acting on the Contact object and will execute after an insert. Next, we will loop through the Contact records that were inserted pulling out all the associated Contact Ids. Here you can add logic to filter out contacts or implement other business logic before adding the contact Id to the Id list of contacts to update.
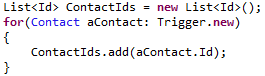
Once we have gathered all the Ids, we will send them to the future method which is expecting list of Ids.
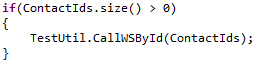
As you can see, this will work on one-off inserts or bulk inserts. Since there is not much code to this trigger, I’ll show you the entire sample code for it here.
So that was painless, let’s move to the future class and we will see how easy it is to make the call to the web service as well.
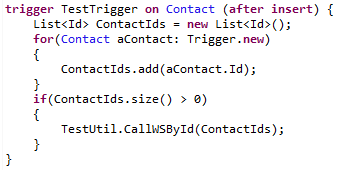
Future methods need to be static and return void since they do not return and values. They should also be decorated with the @future annotation and callout=true.
![]()
It will be more efficient to update the newly inserted records all at once instead of one at a time and with that in mind, we will store the results from our address validation web service in a new list of Contacts.
![]()
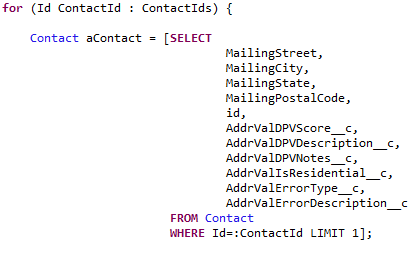
Based on the results from the service, we will either update the mailing address on the Contact record and/or the DPV note descriptions or errors, as well as, the Is Residential flag. Some of these fields are standard on the Contacts object and some are custom ones that we created at the beginning of this project. Here is a sample of initiating the loop in order to loop through the Contact Ids that we passed into this method from the trigger and then the SOQL call to retrieve the details.
In case you are wondering why we just didn’t create a list of Contacts and send those in from the trigger instead of building up the list of Contact Ids, the reason is there is a limitation to @future calls. You can only pass in primitive objects such as Ids, strings, integers and so on. So we went with a list of Ids where in Salesforce Id is its own primitive type.
Demonstrated in the code, which is shown in the next screen shot, are our best practices for service failover to help ensure 100% uptime when making calls to the API. Note, that with a live production key for our API, the URL for the first trial.serviceobjects.com would need to be sws.serviceobjects.com and the second one, the one inside the “if” statement, would need to be swsbackup.serviceobjects.com.
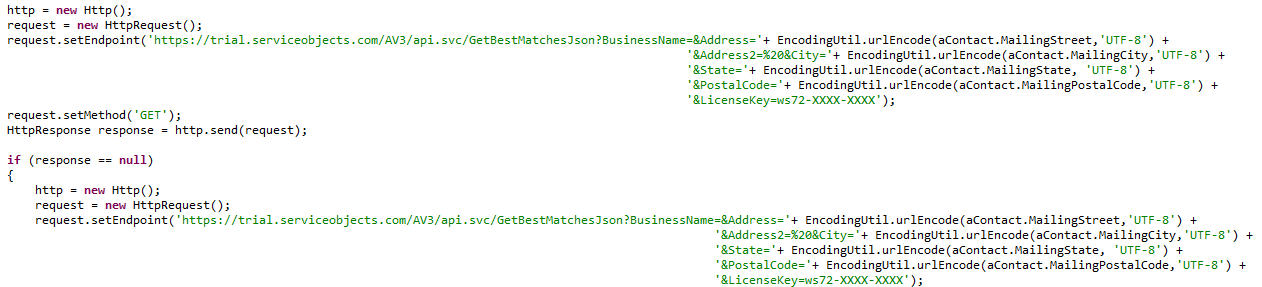
I left both of these as trial.serviceobjects.com because most people starting out will be testing their integration with a free trial key. In the screen shot you will see that I have added the API license key to the call “ws-72-XXXX-XXXX”. This is factitious. You will need to replace that with your proper key based on the live/production or trial endpoint your key is associated with. A best practice suggestion for the key is to “hide” it in a custom variable or custom configuration instead of exposing here in this method.
Once we get a response back from the call to the API and everything is okay, we setup some variables and start parsing the response. There are several ways to parse JSON and definitely better ways than the one described here but this is not an exercise in parsing JSON, it is an example in how to integrate. In this example, we loop through the JSON looking for the field names that we are interested in. We are looking for:
- Address1
- City
- State
- Zip
- DPV
- DPVDesc
- DPVNotesDesc
- IsResidential
- Type
- Desc
But the service returns many other valuable fields, which you can learn about from our comprehensive developer guide found here, which has other helpful information along with the fields mentioned. Remember, if you do end up using more fields from the service and you want to display them or have them saved in your records, you will need to create corresponding custom fields for them. The next screen shot is just a part of the code that pulls the data from the response.
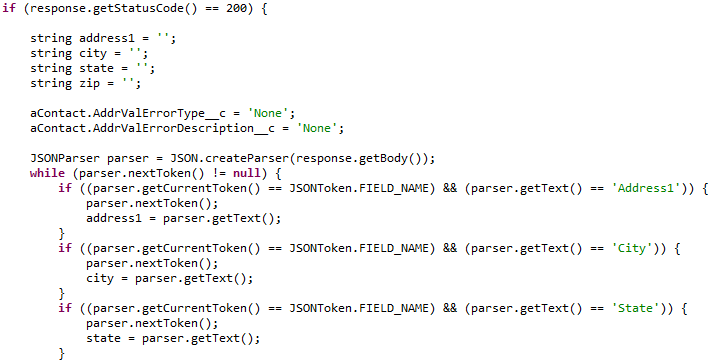
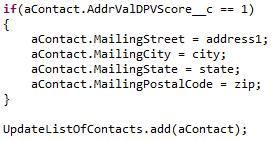
In practice, you may want to make decisions on when to update the original address using more criteria, but in this example we are basing that decision on the DPV score result alone. You can find out more about the different DPV codes back in the documentation. When the DPV value is 1 then we are returning a valid mailing address. Corrections to the address may have occurred so it would be best to update the address fields on the Contact record and that is what we are doing here just before adding the updated Contact to our new list of Contacts.
Once we have looped through the entire list of Ids that we sent into this method, we are ready to do the update in Salesforce. Before this point, nothing yet would have been saved.

And there you have it, go ahead and add some new contacts with addresses and test it out. Over at the Contacts tab I add a new contact and then refreshed the page to see the results. I will purposely make an error in the address so we can see more of the validation results.
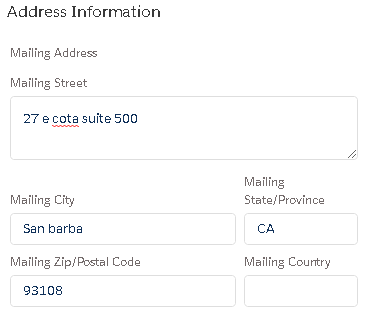
The address we added is for our office and there are several errors in the street name, city and zip code. Let’s see if our system gets it right.
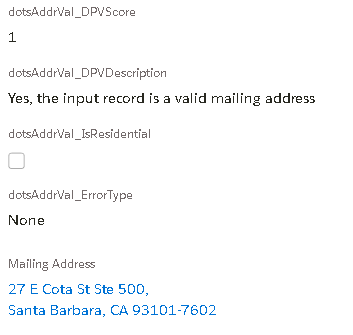
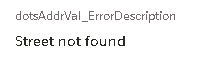
The address validation API fixed the address and returned that the fixed address is the correct address to use based on the inputs. Next, we will demonstrate a bad, non-salvageable address. You will see more than a few things wrong here.

There were so many problems that the address was not salvageable at all.
Let’s try one more, but this time instead of a completely bad address, we will add a bad (not completely bad) address but missing key parts.
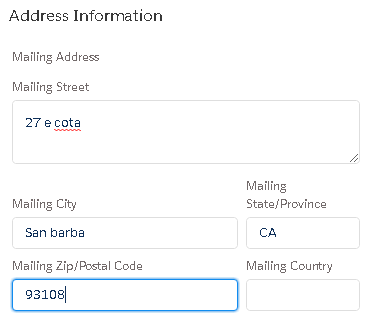
The input address is still not good enough to be good but this time we were able to get details back that can help with fixing the problems.
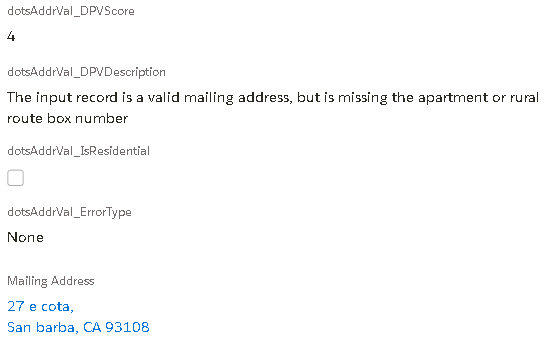

From the results, we can see that the address is there but perhaps a unit number or something key to the address is missing to get full delivery by the USPS.
In conclusion, there are a few things to take into consideration when integrating data quality tools into Salesforce. First, you need to do more error checking. These were simple examples to show how to integration our service and the error checking was the bare minimum and not something I would expect to see in a production environment. So, please…please, more error checking. Second, don’t forget to write the unit tests and try to get 100% coverage. Salesforce only requires 75% to be able to deploy your code, but we highly recommend striving for 100%, it is definitely attainable. Salesforce has this requirement for several reasons. One being that when Salesforce makes updates to their platform, they can run all the units in all the organizations on the platform and ensure they are not going to break anyone’s system. It is just good practice to do so. There is tons of documentation on Salesforce that will help you down the right path when it comes to testing. Lastly, we didn’t make any considerations in the code for the situation where a contact being inserted doesn’t have an address to validate or enough address components. Clearly, you would want to add a check to the code to see if you have a valid combination of data that will allow for an address validation against our API. You will want to see if any of these combinations exist. These represent the minimum or required fields.
- Combination 1
- Address
- City
- State
- Combination 2
- Address
- Zip code
You can find the sample code for this blog on our web site with the file names TestTrigger.trigger and TestUtil.cls at this link.