This is going to be a demonstration in how to setup a Data flow that calls a RESTful API in Azure Data Factory. It’s always important to keep your data as accurate and up to date as possible and there are a few opportunities that present themselves in this kind of process to do validation. Ideally, data is validated on the way into a system originally. Sometimes that isn’t possible and sometimes you are doing data hygiene activities on data as the data gets stale over time. This system deals a lot in data transformations and moving data from one place to another and in that it exposes an opportunity to validate data as it is transformed and/or moved.
Before getting started, make sure the dataset you are testing with doesn’t have many rows. When we hit Data preview options throughout this example the code will execute and potentially call the API or do other live activities that you do not want to do with a large data set while you are testing.
There are nearly 50 steps here but don’t let that stop you, the steps are broken down into very tiny parts, it should be quick to get started.
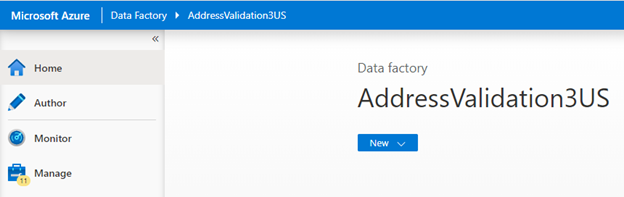
- Create Data Factory
In my case, since we are demonstrating DOTS Address Validation US – 3, I will name my factory to that affect.
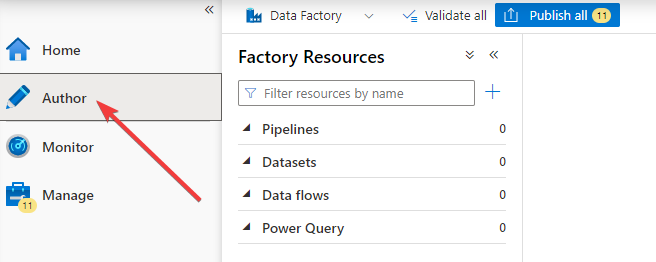
- Click on Author
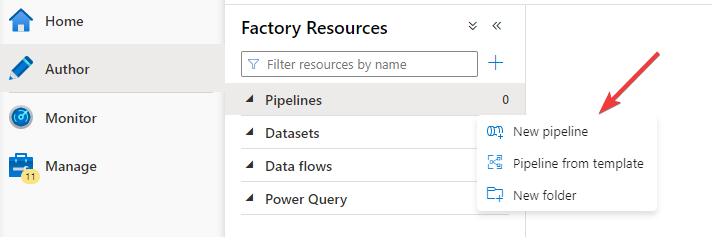
- Hover over Pipelines and click on the three dots that appear and select New pipeline.
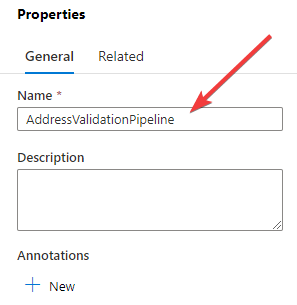
- Name the pipeline in the properties panel under General, I chose AddressValidationPipeline.
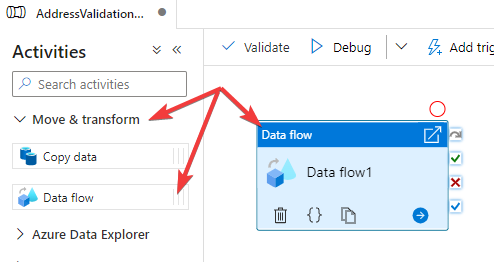
- Expand the Move & transform section and drag a Data flow widget to the canvas.
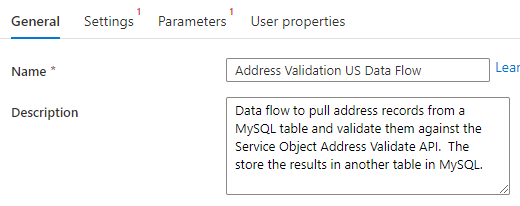
- Name the data flow in the General panel of the Data flow options and leave a description, we used Address Validation US Data Flow for the name.
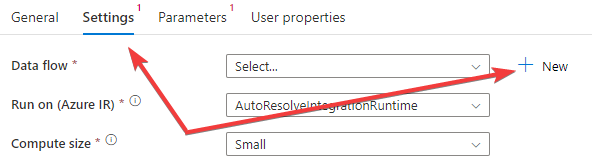
- Switch over to the Settings panel of the Data flow options and create a new underlying flow that this widget will reference. Most of the work will be done in here.
- Now we are ready to add our source, the REST call for the transformation and then sink into a destination. We’ll start by naming the flow n the right panel for the properties of the flow.

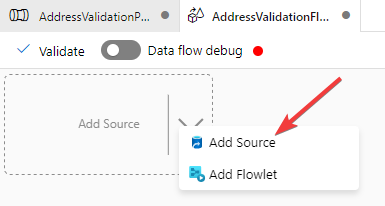
- Click on the down arrow on the Add Source widget and select Add Source.
- Here is where we deviate away from Azure Data Factory and turn to MySQL and look at the underlying database we are going to use in this demonstration.
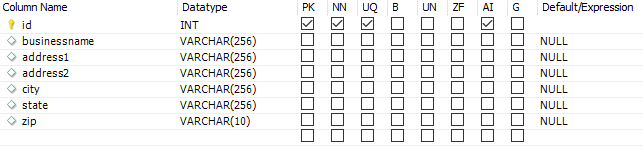
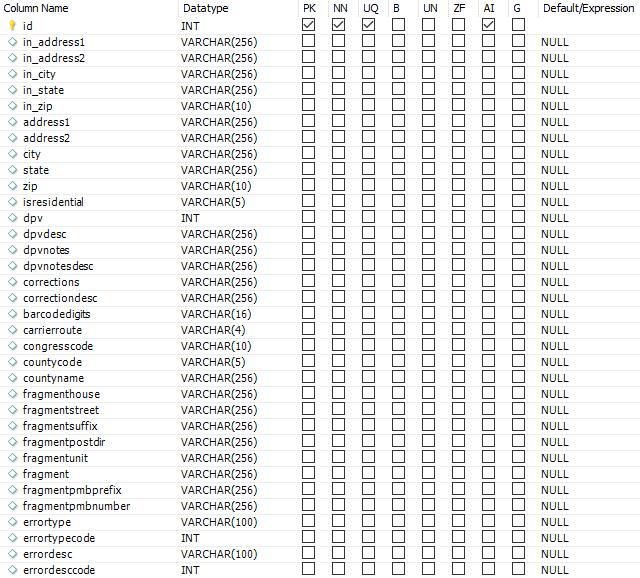
- I’ve created a MySQL database called azure_database with two tables, new_addresses and validated_addresses. Here are the screen shots of the tables in MySQL and attached is the SQL script to generate them to help save some time. I didn’t take much time in getting the column data type sizes just right so with a little analysis the sizes can certainly be tighter.
- new_addresses
- validated_addresses
- new_addresses
- If you are testing from scratch, you can download some sample data from our Sample Data page on the website. You can use this csv data set as a test and import it into your database. I am using that data for this demonstration.
- If you are using an existing database you’ll need to be aware of how your column names match up to these or rather the inputs and outputs from the Address Validation – US service which are defined in our developer guides. You will not need to change your column names; you’ll just need to be aware of how they map to the service. For the output of the service, you will not necessarily need all of the output fields from the service to map to your columns one to one. Just the output values from the service that you will need for your purposes. We highly recommend that you save all the data coming back from Address Validation US – 3 and map all the outputs from the service to the database because you never really want to have to go back to rerun records because business logic or business requirements changed. I will be demonstrating saving all the data to the database.
- I’ve created a MySQL database called azure_database with two tables, new_addresses and validated_addresses. Here are the screen shots of the tables in MySQL and attached is the SQL script to generate them to help save some time. I didn’t take much time in getting the column data type sizes just right so with a little analysis the sizes can certainly be tighter.
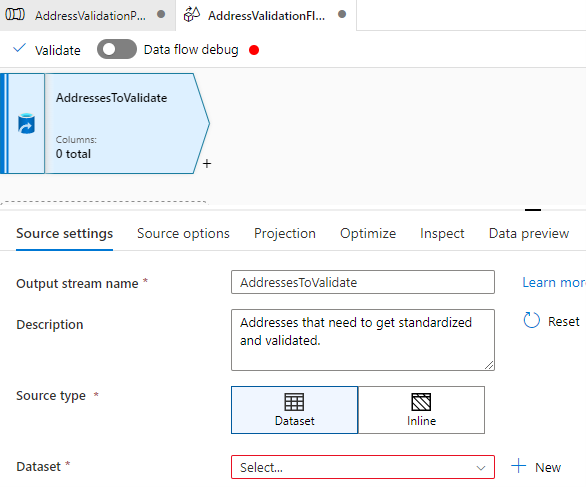
- Next, we’ll set up the data source for the flow. Start by naming and setting a description of the source and output stream.
- Now, we set up the actual data set for this source by clicking on New, unless you already have one predefined, in which case you want to select an item from the dropdown. In our case we’ll be creating a new one.
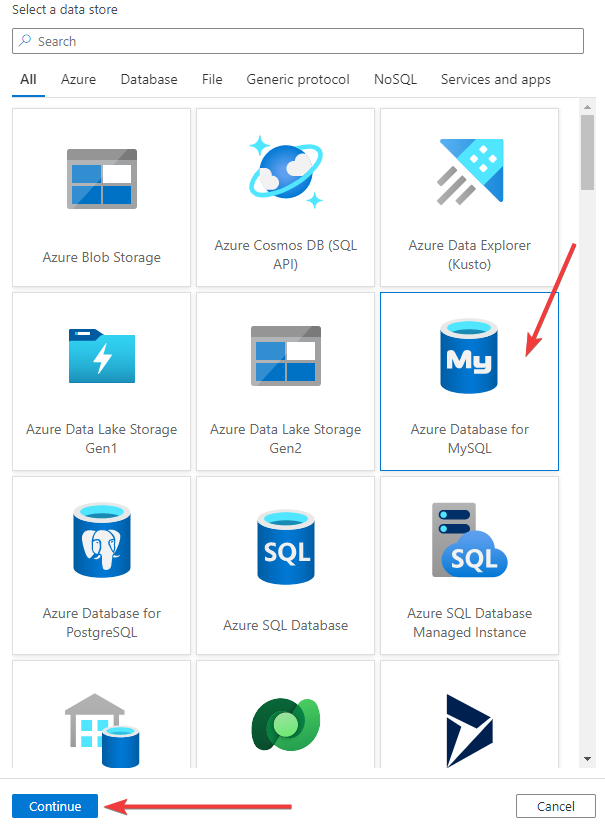
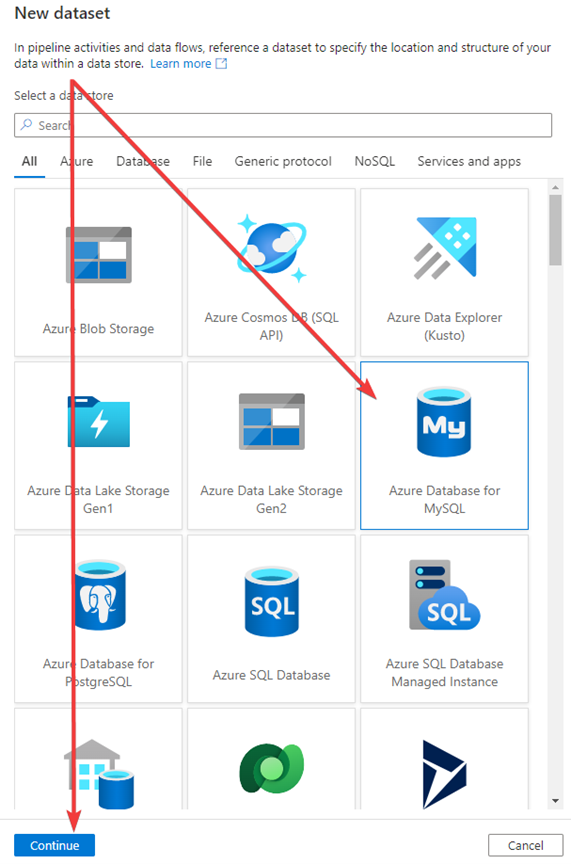
- Select your source and click Continue at the bottom of the page. In our demonstration we’ll be connecting to our MySQL Database on Azure.
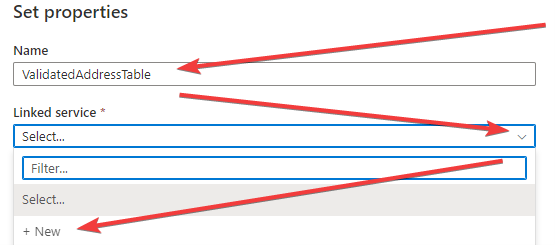
- On the Set properties panel that pops up on the right name the source table and either selected a linked service or create a new one. Since we are doing everything from scratch, we will be selecting a new one.
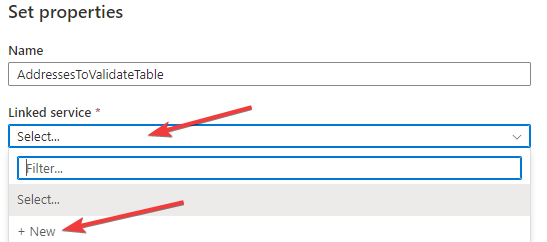
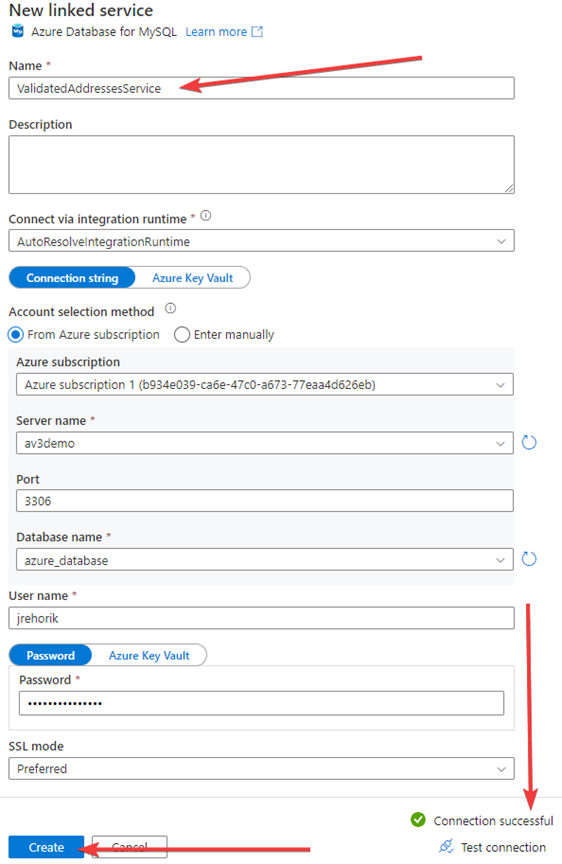
- To create the linked service to our Azure hosted MySQL database, we name the connection, we fill in the details from both the Azure hosted MySQL account and the database.

- Test the connection and then click create.

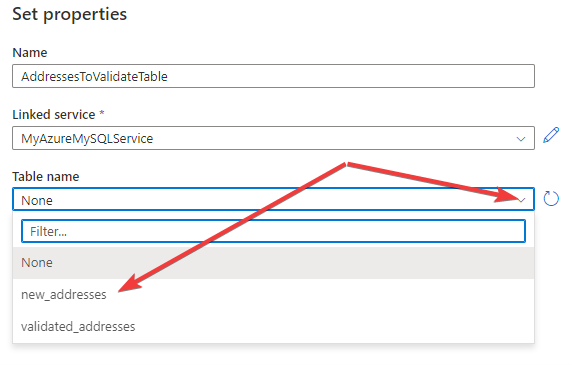
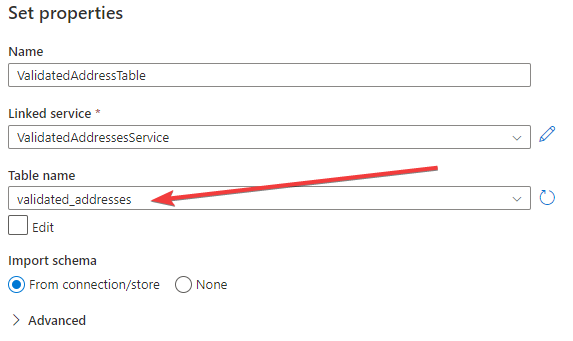
- After the linked service is created, the Set properties panel is where our attention is directed to next. Here we’ll be selecting the table to act as our source table. In our case, we’re selecting the new_addresses table and then click OK at the bottom of that panel.
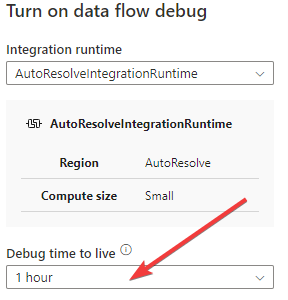
- Now is a good time to turn on Data flow debug in Azure Data Factory and do a Data preview so we can make sure we are getting back what is expected. Click the toggle for Data flow debug under the tabs at the top of the page.

- You’ll then be prompted with a setting you can adjust that keeps the Data flow debug open for one, two or four hours. I set it to one hour, then click OK. Sometimes it can take a while for the Data flow debug to turn on so please be patient.
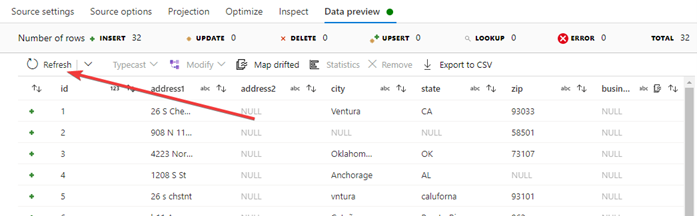
- Once the Data flow debug is on click on Refresh to fetch the latest data for the preview.
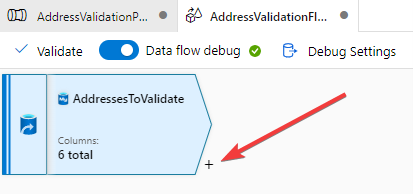
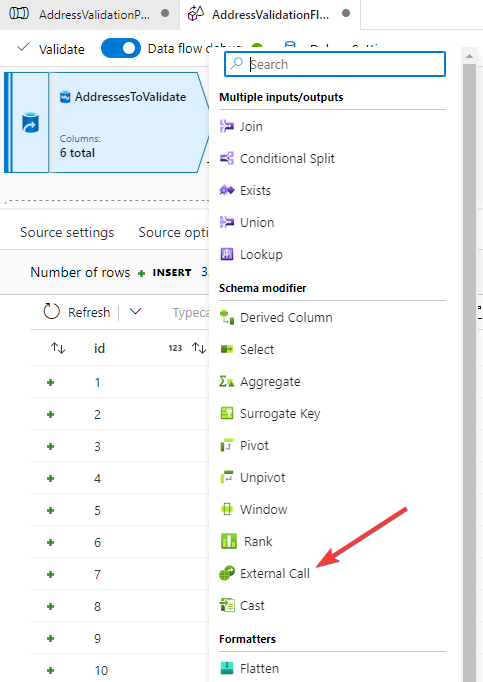
- With the source set up we can now move on to setting up the call to our Service Objects Address Validation US – 3 In the diagram of the flow at the top you’ll see a plus symbol, clicking on the will list several available options to you. The one we are interested in to make the API call is the External Call connector, select it from the list.
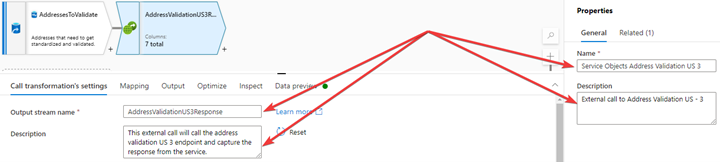
- As always, we want to name the connector, name the Output stream and set the descriptions. After we select the External Call we are presented with those fields to fill in.
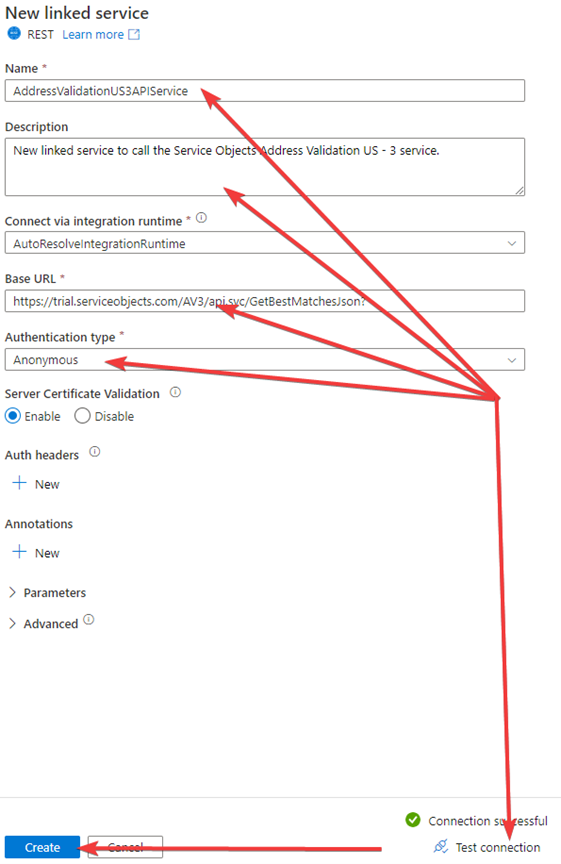
- Now, we move on to setting up the linked service for the API call. We’ll click on new in the settings area.
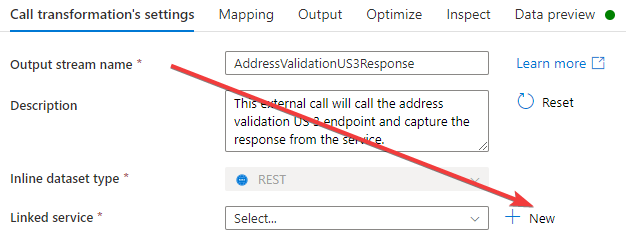
- For the new REST linked service, name it and set a description. The base URL to the Address Validation US – 3 service is https://trial.serviceobjects.com/AV3/api.svc/GetBestMatchesJson?. For authentication type select Anonymous. The license key for the API is passed through as a parameter. Don’t forget to hit Test connection before clicking the Create button.
- Scroll to the bottom of the settings and expand the JSON settings and select the Single document radio button, it will not be selected by default.

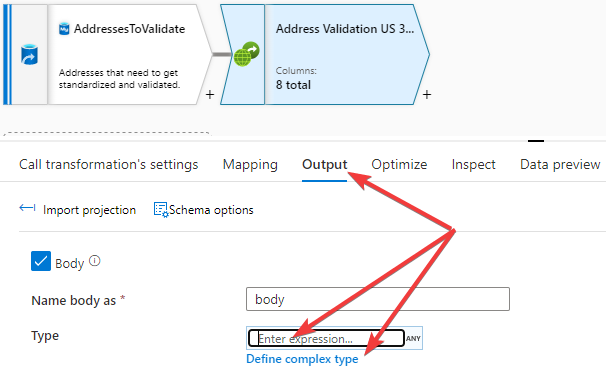
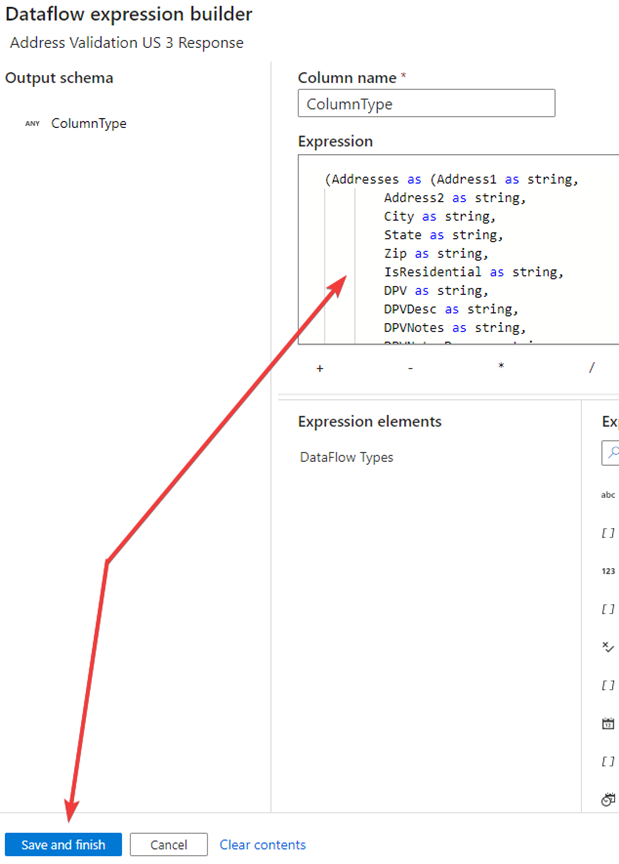
- On the same connector click on the Output tab and in the section for the Body, click into the text box with Enter expression… and then click on the Define complex type text that appear to bring up the Dataflow expression builder.
You should see something like this.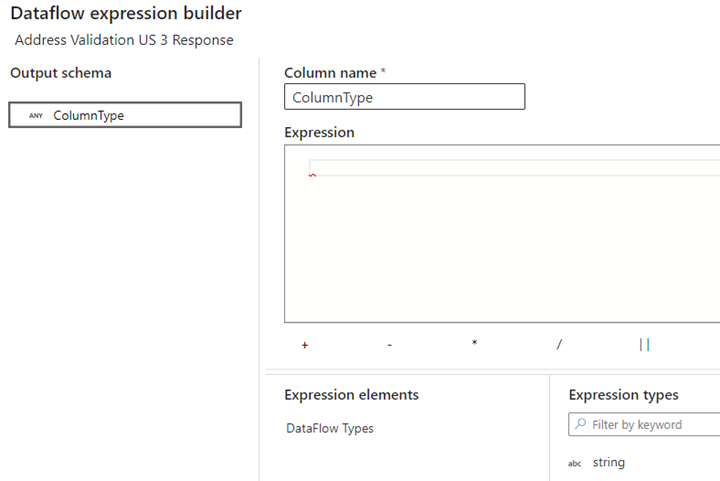
- In the Expression text box we want to create an expression to match the response coming back from the API. So, what we’re going to do is examine the response from the API. The JSON below is a definition of the response and needs to be converted to the expected format in ADF Dataflow expression builder.
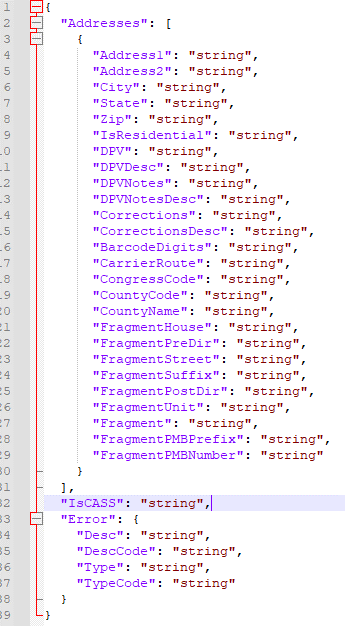
- You can’t see the whole expression in the builder so here is a copy of it in a text editor. As you can see the definition is very similar to the JSON version. There is one part here that may drive you nuts, as it did me, but there is very little documentation out there that tells you how to put this together for a JSON structure where the complex type is an array such as the one we have here. Addresses is an array coming back in the response. Be sure to put the square brackets at the end of the Addresses complex type. This may actually seem obvious to you, but the examples on the web with an array are for XML structures and that is not transferable to JSON.
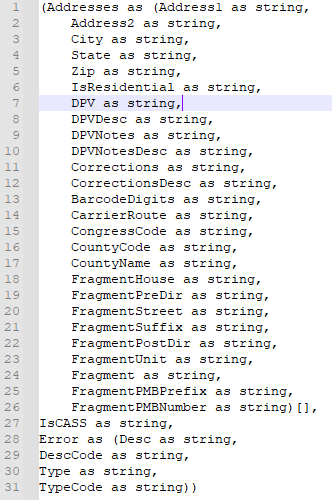
- Add the definition and click on Save and finish. Attached is a file you can use to populate the Expression text area.
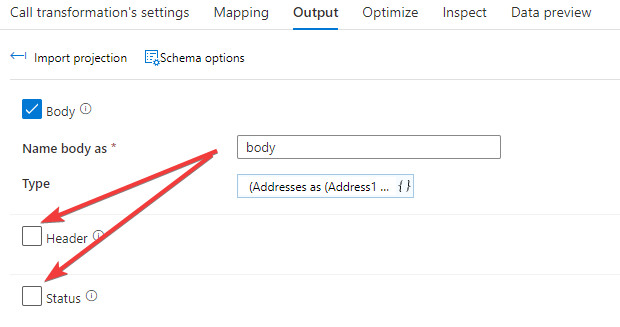
- After saving, you’ll back on the previous screen. Here, I un-check the Header and Status check boxes.
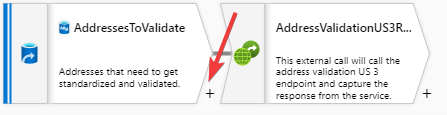
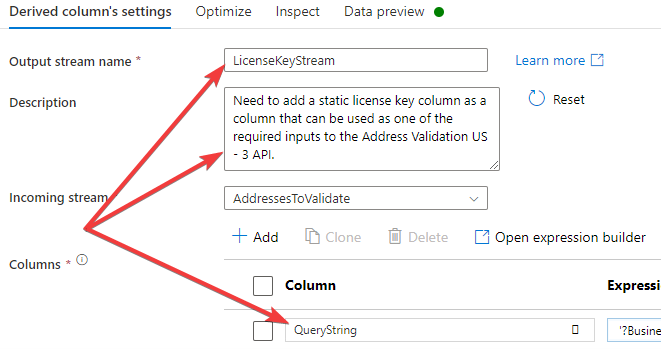
- Most of what we need to hook up for the call to the API is set except for one value. The license key to allow access to the Service Objects Address Validation US – 3 The way we are going to add the part is by adding a derivate connector between the source and external call connectors. Click on the plus sign between those connectors and select the Derived Column connector.
- We’ll set the Output stream name, description and create a column called QueryString.
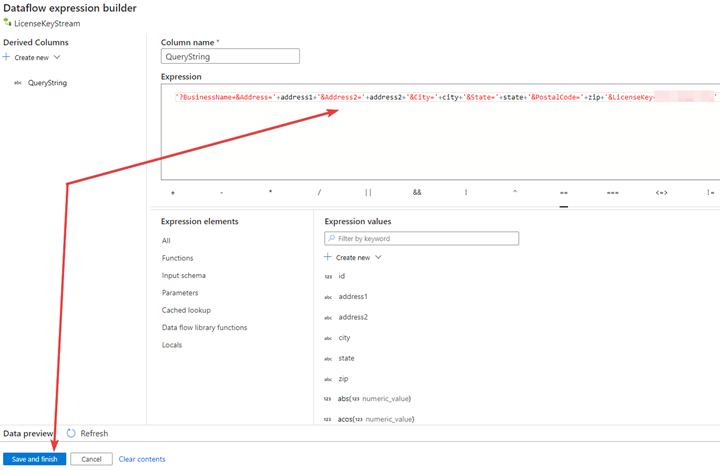
- Now, we’ll open the expression builder to create the needed value. Once you have that value set click on Save and finish.
- Back over on the External Call connector we want to select the QueryString column as the Row relative url. Essentially, what we are doing here is letting our derived column be the appended value to the base URL of the call to the address validation service.

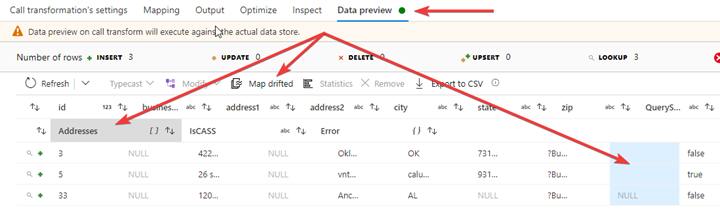
- When we jump over to the Data preview to see what is coming back, we’ll see the inputs and outputs to and from the service. In our case, we’re missing a lot of the Address Validation response. I am a little light on knowing the exact cause of this but Microsoft has instructed me to use the Map drifted connector to fix this issue. Click on Map drifted above the results grid and that will add the Map drifted connector to the next step in the flow.
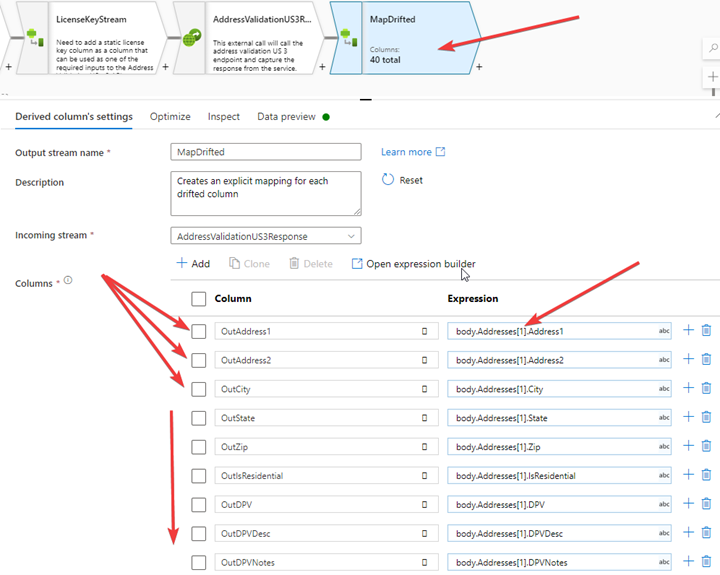
- For the Map drifted connector, I’m not going to name and describe it until I know more about it but for now we’ll be able to make new columns to hold the data that the External Call wasn’t able to capture. We’ll add all the fields the service returns. One thing that is worth noting is the array in the expression with body.Addresses[1]. The service returns an array of addresses when more than one address is a valid address per the input address. Be aware in this scenario, or any others dealing with an array in the response, the index starts at 1 not 0 when it comes to trying to pull the data back.
Here’s the rest of the columns.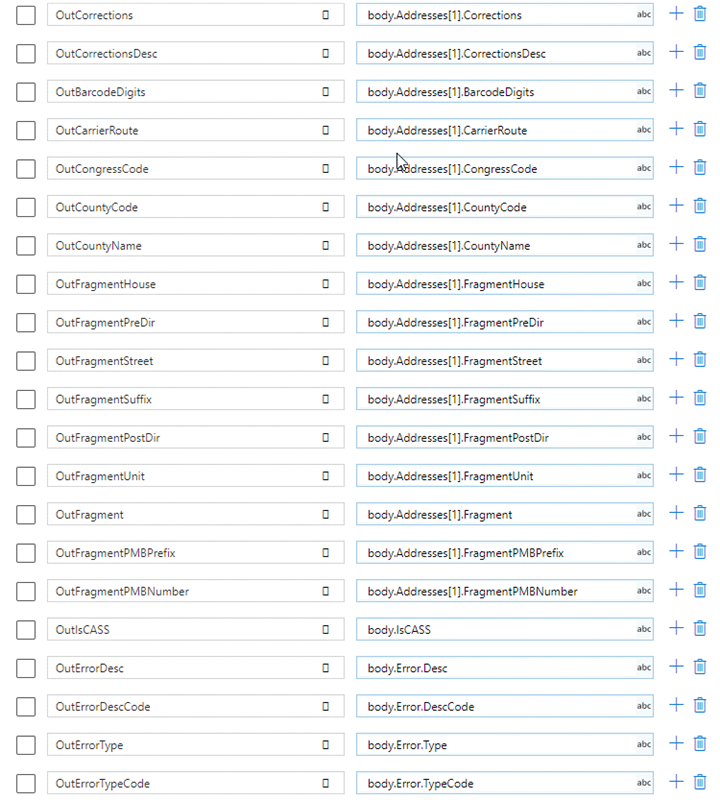
- In the Data preview section, we can see that the response is coming back as expected.

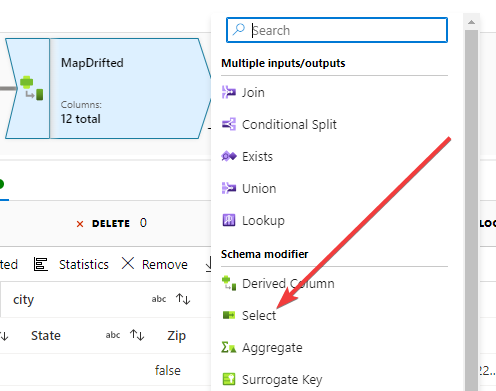
- Now, the goal is to pull the data points that we want to save into the database. We are going to do that with a Select connector and a Sink connector. Starting with the Select connector, click on the plus symbol to the bottom right of the MapDrifted connector and then select the Select connector.
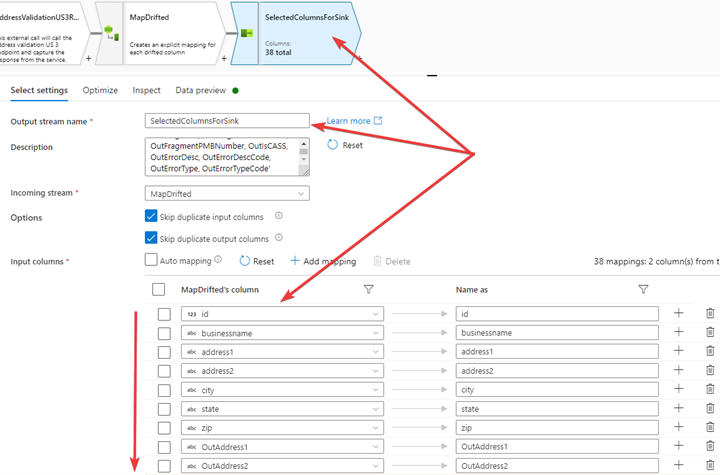
- Not much to do here on the Select connector. I named it SelectedColumnsForSink and left the description alone, the default value is fine. The only other thing I did here was remove a couple columns unrelated to what I wanted to Sink in the next connector. Otherwise, I kept everything else. My recommendation is to keep everything related to the response coming back from the service, so you don’t have to go back and rerun transactions if your business logic changes and you find yourself needing another value.
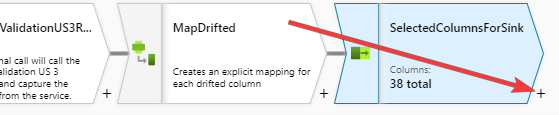
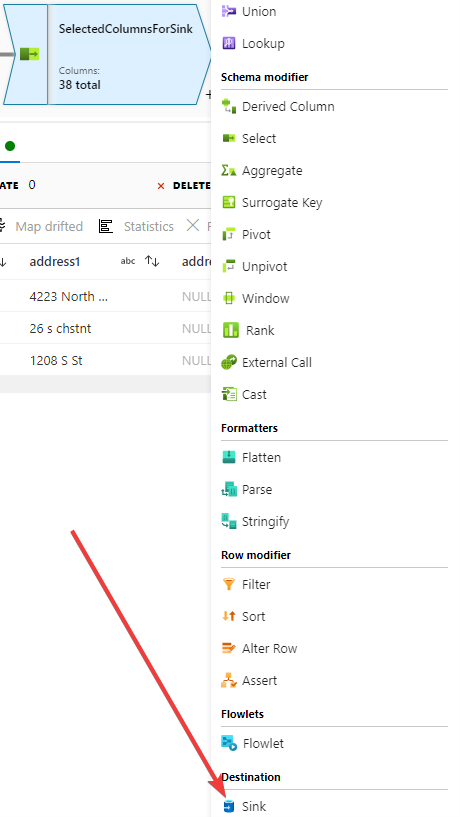
- Now for our final connector, the Sink connector. This will insert the results from the Address Validation US – 3 service into the underlying table we set up earlier, validated_addresses. Again, click on the plus symbol to the bottom right of the Select connector and select Sink.
- The Sink is the destination. We are going to setup the Sink in a similar way we did with the source. We are going to name the Output stream, set the description and click on New for the Dataset option. It’s important to note that in this example we are doing inserts but upserts and updates are also available. We are adding the results to a new table but in many cases, you’ll simply want to update the table from where the data originated.

- We could reuse the connection to the MySQL database we used earlier but I am just going to create another one. Your destination could be any of the items in this list though. Just because I started with MySQL as my source doesn’t mean the destination needs to be the same place. Select Azure Database for MySQl and click continue.
- In the Set properties Name the connector and select New from the dropdown list to create a new linked service.
- Setting up the new linked service will do the same way as we earlier when we setting up the source. Don’t forget to test the connection and then click Create.
- After the new linked service is created, select the table name from the dropdown. Then click OK.
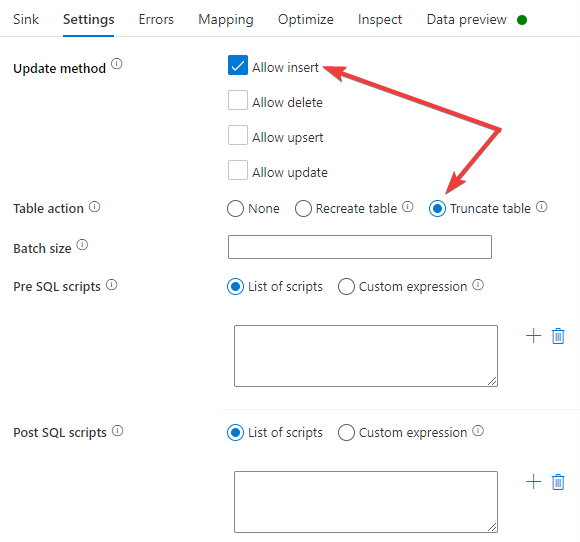
- Still on the Sink connector, switch over to the Settings section and have Allow insert checked and the rest unchecked for the Update method area. I also set my table action to Truncate table because this is a demo and for testing, I’d like to start fresh for every test.
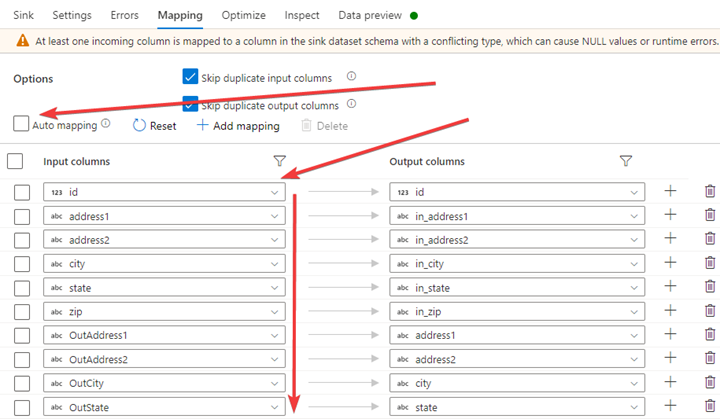
- In the Mapping section, deselect the Auto mapping feature. Then map the input columns to the output columns.
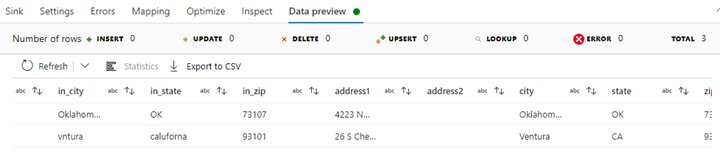
- In the Data preview for this connector, we see that we have all the columns we expect in the Sink.
That does it, from here all that is needed is to publish the flow to the Data Factory. Hopefully you found this helpful, but if you have any questions about implementation or deeper details about the service, please reach out and we’ll be happy to go over it with you.