Welcome back to our blog series where we demonstrate the various ways you can achieve high data quality in Salesforce through the use of Service Objects’ validation tools.
In the first part of this series, we showed how to create a trigger and an Apex future class to handle calls to our web service API. That blog described a common way, in code, to call our services in Salesforce. But, there are more simple ways to do this.
In this blog, we are going to step back and demonstrate an integration that requires little more than drag and drop to achieve your goals by implementing a plug-in on a flow. Because – why write code if you don’t have to? When we are done you will be able to create a flow and drop our plug-in anywhere in your process and wire it up.
We are going to start by looking at some basic setup. Then we will step through the code. What code? You are probably wondering, “Why do we need to look at the code, if we don’t need to write any”. Well, if you wanted to implement any additional business logic or tailor the plug-in, you will be equipped to do just that.
After we review the code, we will jump into creating a sample flow that allows a user to enter either a US address or Canadian address and process that data through our US and Canada validation APIs and then display those results back to the screen.
In this section, we will need to do some setup before we get started. We will need to register the Service Objects’ endpoint with Salesforce so that we can make the web service calls to the address validation API’s. We went over this in the previous blog but it is worth repeating here.
The page where we add the URL is called “Remote Site Settings” and can be found in Home->Settings->Security->Remote Site Settings. This is the line I added for this blog.

Be aware that this will only work for trial keys. With a live/production key you will want to add a URL for for sws.serviceobjects.com and swsbackup.serviceobjects.com. As a best practice, you’ll want to add both endpoints with your live key, to take advantage of our fail-over capabilities. We named this one ServiceObjectsAV3 because we are really just reusing it from the previous blog but you can name it whatever you want.
No need for custom fields to get this example to work but you will likely want to create the same ones or similar as those in the previous blog, seen here.
This section shows the structure of the plug-in class for the US address validation, that we are naming AddressValidationUSA3, and the signature of the invoke and describe methods. The invoke method will contain the business logic and the call to our web service API. The describe method sets up the input and output variables for the plug-in that end users will be able to connect to on a flow.
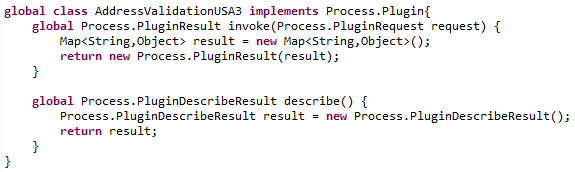
The describe method also allows you to supply definitions and descriptions of the variables on the plug-in itself that will appear in the flow interface. The definitions used here are important because it can save a lot of time for the end user that is developing a flow. I would resist skipping this to save time. The following is just a snippet of the code.
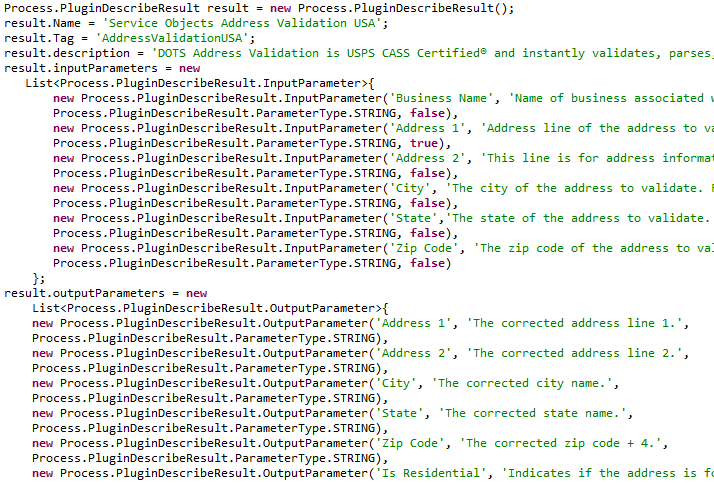
There really isn’t much else to the describe method, most of the business logic happens in the invoke method. In the invoke method, we will gather the inputs to the plug-in and do some initial formatting to make sure we have valid characters in the call to our API. In gathering the inputs, we make sure to use the names of the inputs that we used in the describe method.
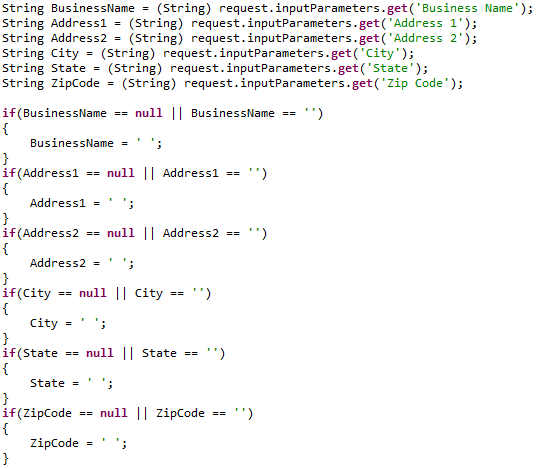
Since we will be making a path parameters call to the API, we want to account for anything that could break the URL like missing parameters. A missing parameter using our API should break the call but on other APIs it could simply change the meaning of the call and end up returning unexpected results. To make sure there are no issues with missing parameters, we simply replace any ones that are missing with space character. Just as in the previous blog, there will be minimum field requirements before it even makes sense to call the operation. The operation we are using is GetBestMatches and these are the requirements.
- Combination 1
- Address
- City
- State
- Combination 2
- Address
- Zip code
If you do not have some combination of these inputs then it is best to add code to avoid the call completely, since there is no way to validate an address otherwise. By “avoid the call,” we mean avoid even hitting the plug-in at all, since it would not be necessary. A decision component in a flow can help with the process.
In an effort to simplify the code, I pushed the logic for calling our API into a method called CallServiceObjectsAPI which should make things easier to read. Using this method, we pass in the input parameters that we cleaned up.

Below, I show how to setup the HttpRequest/HttpResponse and the request URL. After that, I add in some basic error checking to check for a couple results. First, I am checking to see if there was an error with the API call and/or the result from it. If other errors happen outside of that then we catch the general exception, which I would assume is a connectivity issue at that point. You can try to catch more specific exceptions on your own but what I have here will work in a general fashion. In the instance of an error or exception on the call to our API, we also demonstrate our standard best practice of failover by adding code to call another endpoint in these situations. In the case of this blog, we are walking you through a trial key scenario, so failover in this case will not be true failover since it is failing over to the same trial.serviceobjects.com endpoint. But in a live key scenario, you would be encouraged to use sws.serviceobjects.com for the first call and swsbackup.serviceobjects.com for the failover call.
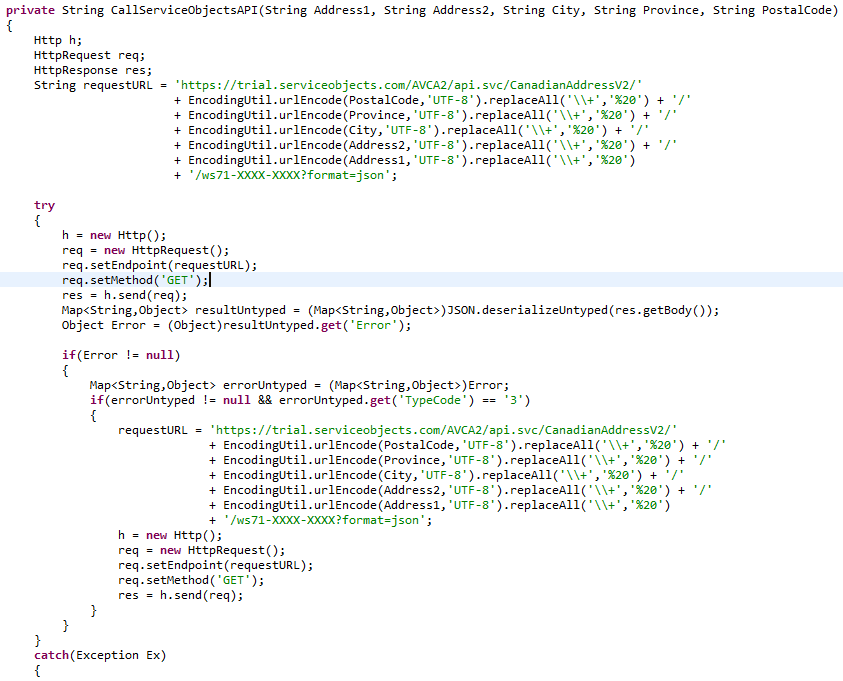
Another thing you may have noticed in the code above is that the input parameters to the API call are URL encoded and “+” are switched to “%20”. The reason for this is that certain characters are not allowed in a URL or a path parameters call, so the built-in Apex function urlEncode cleans that kind of thing up. One side effect that the encoding has is it replaces spaces with “+” symbols. Though in a URL “+” symbols are becoming the norm, path parameter calls still have issues with them. So the proper way to make the call work is to replace the “+” symbol with a “%20” which will be deciphered correctly as a space in the end. The method returns a string response from the web service and based on the call made, it is more precisely returning a JSON string response which we save in the variable ServiceObjectsResult.

The first thing we do after we get the response from the method is deserialize it into a Map object so we can start processing the result. Here is the rest of the code.

This section of the code is checking to see the type of response that was returned. The response could have been either an address, error or network error response. Based on those variations, we populated the corresponding output values in Map variable called “result”. In the Map, we map the outputs from the service to the expected outputs described in the describe method. Those values are the output values of the plug-in and are directly interfaced with in the flow. Adding code anywhere in the method we just went through would be appropriate based on your own specialized business logic.
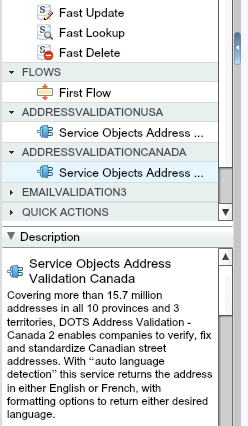
Now that we have gone over the code, we are ready to jump in and show an example of our plug-in in a flow. For this example, I also created a Canadian address validation plug-in to make it a little more interesting. However, I do not see any service we offer that would not make for an appropriate and powerful example.
As I mentioned on the outset of this blog, I will show you a demonstration of a flow where the end user will be presented with a data entry screen. They will have options for adding either a US address or a Canadian address. From there, we will wire it up to either the US address validation plug-in or the Canadian address validation plug-in and then finally display the results to the screen. This flow will be more of an example on how to wire up the plug-ins rather than creating an input and output screen. Though doing something with screens is not out of the question, it will be more realistic to have a flow that manipulates Contact, Account or Custom objects without an interface.
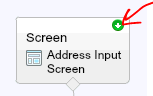
Start by creating a new flow in the Process Automation section. I am just going to open the one I already had saved. Dragging on the Screen object is the first step and be sure to set it to be the starting interface by setting the green down arrow on the object. A flow cannot be saved without one part of it being a starting point.
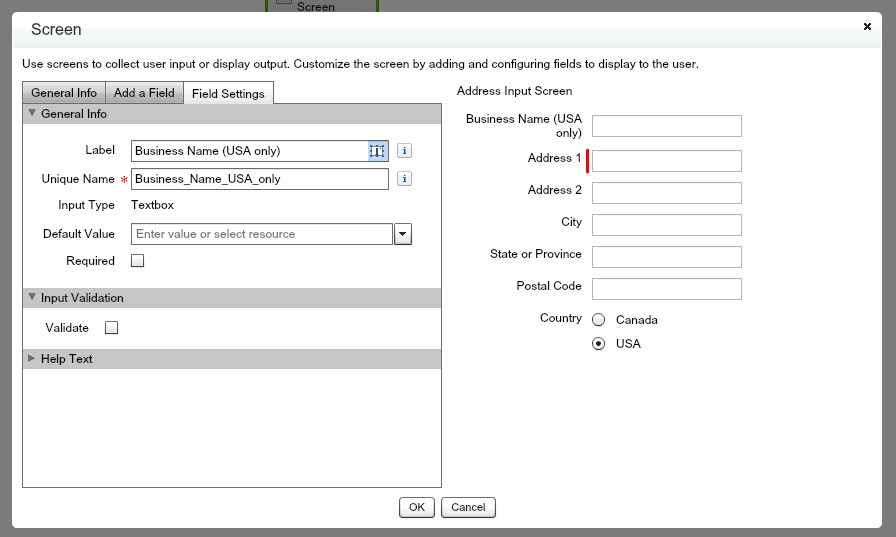
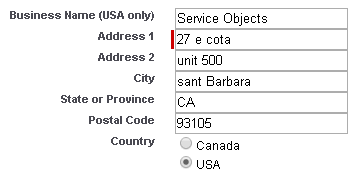
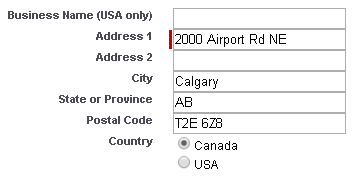
Inside this interface you will setup the input fields that you want to retrieve from the user. In this example, we forced the Address 1 field to be a required field and at the bottom we added a radio button selection for the desired country, defaulted to USA.
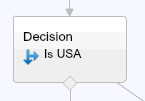
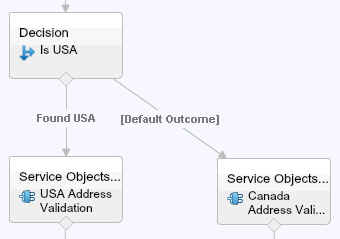
Once we have the inputs from the user, we need to find some way to route the variables to either a US address validation or a Canadian address validation. For that we can use Decision Logic Tool. We will configure it to look at the country field and make a decision on which way it should continue to process.
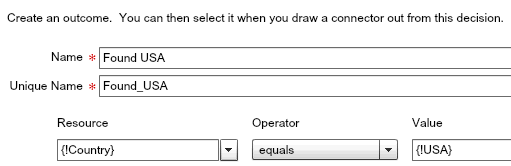
The actual logic simply decides to go down the US address validation path if USA is found otherwise it will assume it is a Canadian input address.
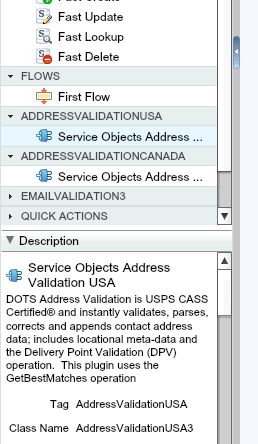
Now we are ready to drop our US and Canada address validation plug-ins on the screen. On the left, in the Tool area you can find the plug-ins under the respective names you gave them in the creation of the plug-in.
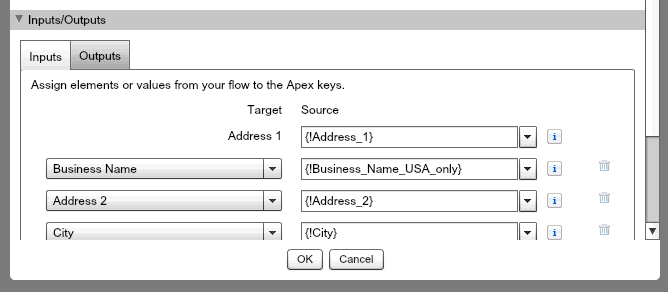
You can and will be forced to drag them onto the flow canvas one by one and set them up individually. Inside you will be mapping the inputs from the user data entry to the inputs for the plug-ins. Additionally, you will be mapping the outputs to variables you create or objects variables in the system. This can take some time depending on how many of the address validation outputs you want/need to use.
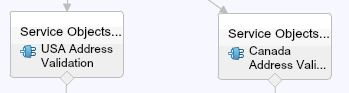
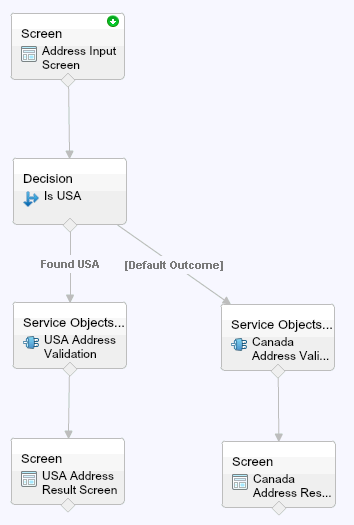
When you are done with that part, you will wire them up in the flow to the decision tool you added earlier as shown below.
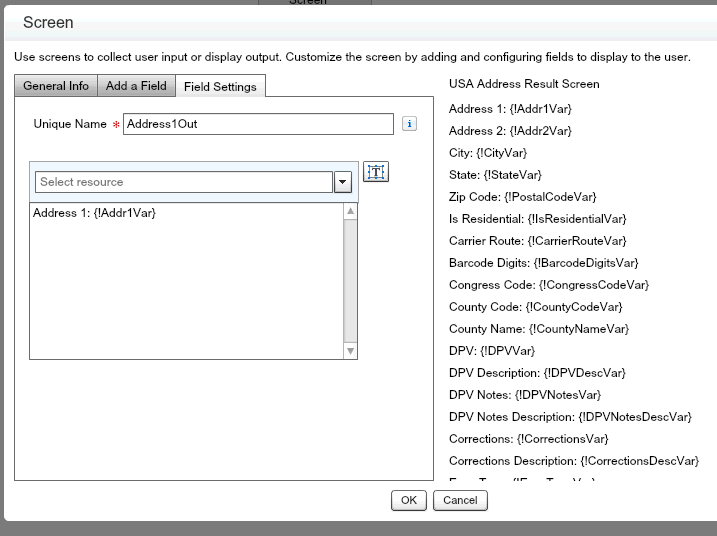
In this last part, we will setup two output screens, one for the US address validation results and one for the Canadian address validation results. This time instead of adding text boxes to the interface, we just add a display object for each field we want to show.

After wiring the last screens, the completed flow will look like this.
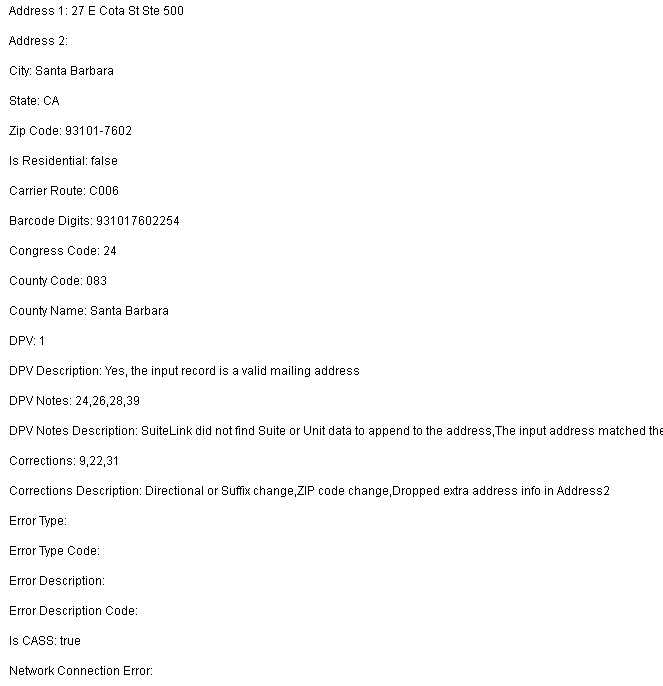
From here you can choose to save the flow and then add layout options on other screens that will give you access to executing the flow, schedule the work flow to run at a specific time (not useful in our example though) or you can run it directly from this interface by clicking Run. We will demonstrate it by clicking Run. We’ll start with a US address and then view the results on the output screen. In this example, you can see there are several issues with this address. Street name is incomplete, it uses unit instead of suite, city name is misspelled and even the postal code is wrong.
Upon validation, we see that the system was able to correct the address and had a DPV score of 1 meaning the result is a perfect address. The DPV score is one of the most important fields to pay attention to in the output. It indicates the validity level of the address. You’ll see other information in the response that will give you an idea about what was changed or if there were any errors. You’ll also have access to the fragments of the address so you can process the response at a more granular level. More details about the fields can be found here.
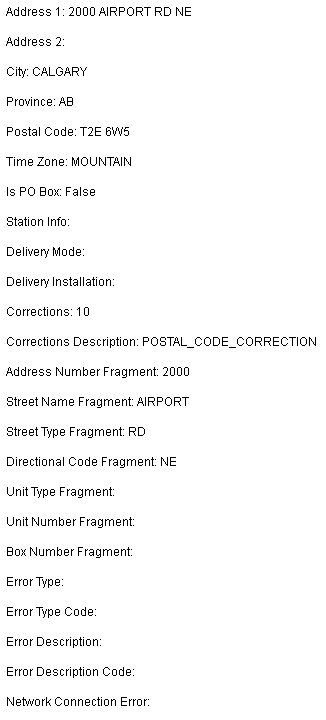
In the last example, we will use a Canadian address. In this case the only thing wrong with the address is the postal code, so we’ll see how the system handles that.
Sure enough that address validated and the postal code was corrected. In the US address validation service, the DPV score and error result indicated the validity of an address. In the Canadian validation service, we really only need to look at the error fields. Empty or blank error fields will mean that the address is good and can receive mail.
In conclusion, we learned how to create a plug-in and then use it in a flow. Though you do not need to know how the plug-in was made to be able to use them, it is very helpful to know the details in the case that your business logic requires a more tailored solution. And you can see that in this demonstration adding additional code does not take much effort. These plug-ins allow you to get up and running very quickly without needing to know how to code. As I mentioned earlier, the flow created here is definitely a use case but more often than not I would imagine Salesforce administrators creating flows to work on their existing objects such as Contact, Account or some other custom object.
A quick note on the license key, you will want to add you own license key to the code. You can get one free here for US address validation and here for Canadian address validation (Each service will require a different license key).
The last thing I want to discuss about the license key is that it is good practice to not hard code the key into the code. I would suggest creating a custom object in Salesforce with a key field. Then restrict the permissions on the field so that it is not view-able by just anyone. This will help protect your key from unwanted usage or theft. At this point, we have the code for these two address validation plug-ins, but Service Objects will continue to flush out more for our other services and operations. With that said, if there is one you would like to request, please let us know by filling out the form here and describe the plug-in you are looking for.