PyPI (Python Package Index) is a repository of software packages for the Python programming language. Its primary purpose lies in providing an invaluable platform for developers to seamlessly distribute their Python libraries to the broader community. This blog will guide you through the steps to publish your library on PyPI. From preparing your library and registering an account to testing, building distribution packages and uploading them, we’ll cover each aspect of the deployment process. You can share your Python library with others in the developer community through PyPI. Let’s begin!
Step 1: Prepare Your Library
Before deploying DOTS Address Validation – US 3 on PyPI, we make sure it includes metadata about your library in the pyproject.toml file. This metadata encompasses crucial information such as the library’s name, version, description, authorship and licensing details.
Step 2: Register an Account on PyPI:
Initiating the process of deploying ‘Address Validation – US 3‘ on PyPI requires the creation of an account on the platform. By visiting https://pypi.org/ and clicking the “Register” option, you can initiate the account registration process. You will be prompted to fill in the information listed and verify your email address to activate your account.
Step 3: Build and Test your Library
Before deploying, it’s crucial to test your library to ensure it works as expected. Run unit tests, check for any errors or issues and make any necessary improvements.
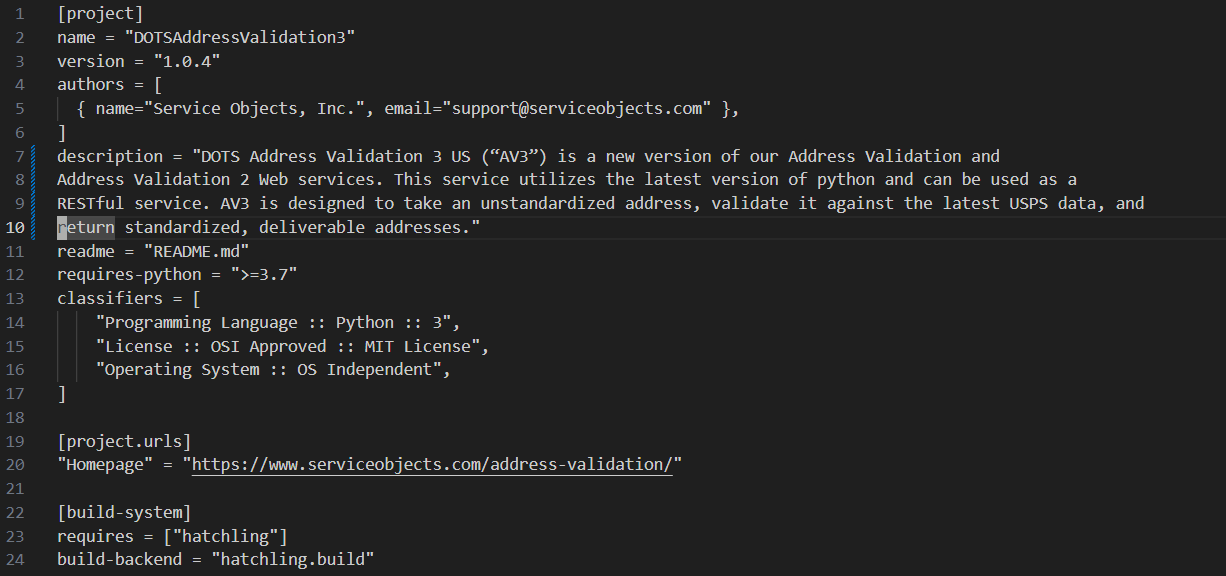
We first make sure there is a pyproject.toml file in the root folder for the project and that follows the following template:
Step 4: Generate Distribution Packages
To deploy Address Validation – US 3 library on PyPI, we need to generate the distribution packages. These packages contain the library’s code, metadata and installation instructions. Python provides two commonly used tools for this purpose: `setuptools` and `hachling`.
- Build the distribution package: In the terminal, navigate to the library’s root directory (where setup.py is located) and run the following command:
python3 -m build
This command will create two distribution packages: a source distribution (`.tar.gz` file) and a wheel distribution (`.whl` file).
Step 5: Upload your Package to PyPI
Now that you have your distribution packages ready, it’s time to upload them to PyPI.
- Install `twine`: Open a terminal and run the following command:
python3 -m pip install –upgrade twine
- Upload the distribution packages: In the terminal, navigate to the directory containing the distribution packages and run the following command:
python3 -m twine upload –repository testpypi dist/*
This command will upload all the distribution packages to PyPI. You will be prompted to enter your PyPI username and password. After successful authentication, the packages can be uploaded.
Step 6: Verify and Publish your Library
After uploading your packages, we can visit the official ServiceObjects PyPI account to verify that our Address Validation – US 3 library has been successfully deployed. At this point, we can perform one last check that the package details, description and other metadata to ensure everything is accurate.
Conclusion
Deploying your Python library on PyPI opens up a world of possibilities for collaboration and sharing within the development community. This blog has taken you through the step-by-step process of bringing your library, such as Address Validation – US 3, to the Python Package Index. These steps explain how to ensure a successful deployment of your library.