
In an ideal world, data entry would always be perfect. Sadly, it isn’t – human errors happen to end users and call center employees alike. And while we make a good living cleaning existing bad data here at Service Objects, we would still much rather see your downstream systems be as clean as possible.
To help with that, many organizations are getting an assist with Google, in the form of the Autocomplete with their Places API. If you setup your form properly and use their API you can have address suggestions appear in a dropdown for your end users to take advantage of to help enter correct data into your system. That’s great, isn’t it?
It does sound great on the surface, but when you dig a little deeper there are two problems:
- First, Google Places API often does not often suggest locations to the apartment or suite level of detail. The point is that a considerable segment of the population lives in apartments or does business on separate floors, suites or buildings.
- Second, the locations the Google Places API suggests are often not mail deliverable. For instance, a business may have a physical location at one address and receive mail at a completely different address. Or sometimes Google will just make approximations as to where an address should be.
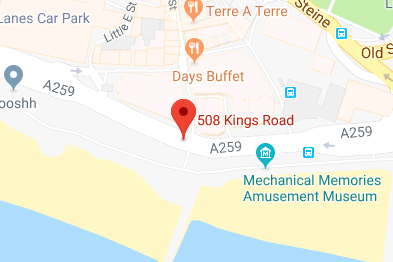
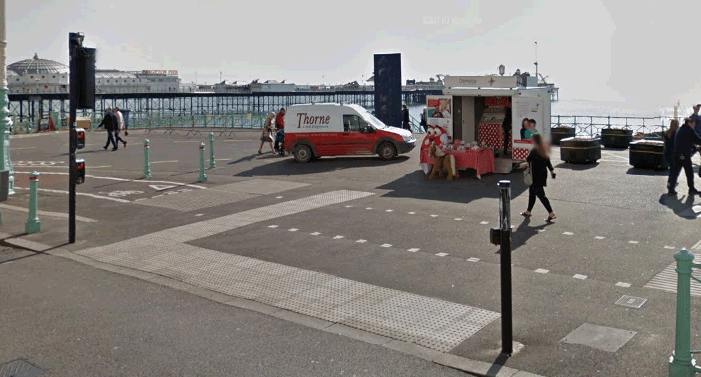
For example, check this address out on Google Maps: 08 Kings Rd, Brighton BN1 1NS, UK. It looks like a legitimate address, but as the street view shows, it does not seem to correspond to anything.
These issues can leave gaping holes in your data validation process. So, what can you do? Contact us at Service Objects, because we have the perfect solution: our Address Suggestion form tool. When combined with the Google Places API you will have a powerful tool that will both save time and keep the data in your system clean and valid.

This form tool is a composite of the Google Places API and our Address Validation International service. The process consists of the data entry portion, the Google Paces API lookup, then the Address Validation International service call, finally displaying selectable results to the end user.
Let’s start by discussing the Google API Key, and then the form, and finally the methods required to make that Google Places API call.
Google Places API requires a key to access it. You can learn more about this API here. Depending on your purposes you may be able to get away with using only Google’s free API key but if you are going to be dealing with large volumes of data then the premium API key will be needed. That doesn’t mean you can’t get started with the free version: we in fact use it to put our demos together, and it works quite well.
When setting up your key with Google, remember to also turn on the Google Maps Javascript API, or else calls to the Places API will fail. Also, pay particular attention to the part about restricting access with the API key. When you have a premium key this will be very important because it will allow you to set the level at which you want the key to be locked down, so that others can’t simply look at your Javascript code and use your key elsewhere.
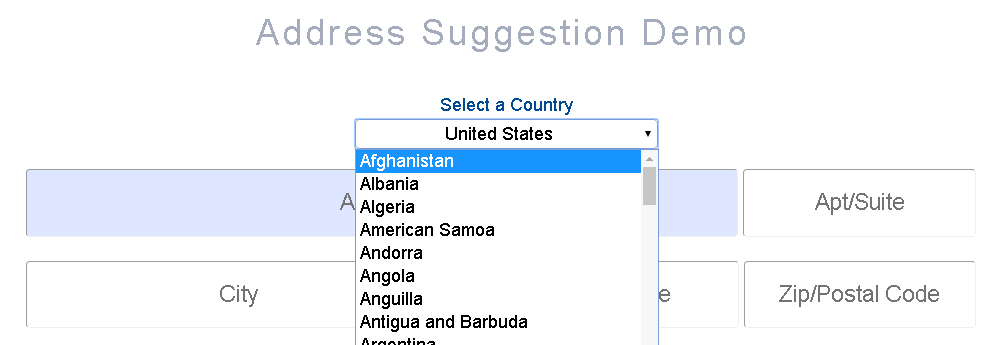
The form we need to create will look like a standard address data entry form, but with some important details to note. First let’s look at the country select box: we recommended that this be the first selection that the user makes. Choosing a country first benefits both you and the user, because it will limit suggested places to this country, and will also reduce the number of transactions against your Google Places API key. Here is a link to how Google calculates its transaction totals.
Another important note is that we need to have the Apt/Suite data entry field. As mentioned earlier, the Google Places API often does not return this level of resolution on an address, so we add this field for the information be provided by the end user.
The rest of the fields are really up to you in how you display them. In our case, we display the parsed-out components of the results from selected address back into the rest of the address fields. We keep all the address input fields editable so that the end user can make any final adjustments they want.
The methods associated with this process can be summarized by a set of initializations that happen in two places: first, when a country is selected, and second, when the focus is on the Address field by a user clicking into it. For our purposes we default the country selection to the United States, however when the country is changed the Autocomplete gets reinitialized to the selected country. And when a user clicks into the Address field, the initialization creates a so-called bias, e.g. Autocomplete returns results based on the location of your browser. For this functionality to work, the end user’s browser will ask to let Google know its location. If the user does not permit Google to know this the suggestion is turned off and does not work.
This bias has a couple of interesting features. For instance, you can change the code to not utilize the user’s browser location but instead supply a custom latitude and longitude. In our example, the address suggestion does not end up using the user’s current position when the selected country is not in the same country as the user. But when the user is in the same country as the selected country then the results returned by the Google Places API are prioritized to your location. This means that if you are in Santa Barbara, CA and select the United States as the country, when you start typing a United States address you will first see matching addresses in Santa Barbara, and then work outward from there.
You can customize the form bias to any particular location that you have a latitude and longitude for. The ability to change this bias is very useful in that setting the proper bias will reduce the number of lookups against the Google Places API before finding an address match, and will also save manual typing time.
Now let’s discuss the Address Validation International service API call, which consists of a key, the call to the service and setting up best practices for failover.
Let’s start with the key. You will need to either have a live or free trial license key from us, the latter of which can be gotten here. For this example, a trial key will work fine for exploring and tinkering with this integration. One of the great things about using our service is that when you want to turn this into a live production-ready solution, all you have to do is switch out the key from the trial to the production key and switch the endpoint to the production URL, both of which can be done in minutes.
The call to the Address Validation International service will be made to either the trial or production endpoints, which will depend on the key that you are using. The details of the service and how to integrate with it can be found in our developer guides. In the Javascript code you will round up all the data in the fields that were populated by the address suggestion selection and send them off to the service for validation. The code that manages the call to the Address Validation International service needs to be executed on some back-end server client.
It is strongly discouraged to make the call to the service directly from Javascript, because it will expose your license and allow someone to take it and use your transactions maliciously. You can read more about those dangers here. Also, here is a blog about how to make a call to another one of our services using a proxy. The basic idea is that your Javascript call will call the proxy method that contains your license key, essentially hiding it from the public. This proxy method will make the final call to the Address Validation International service, get the results from it and pass those results back to the original call in the Javascript. In this situation, the best place to implement failover is in the proxy method.
So what is failover? Failover, from the perspective of an end user developer, is just a secondary data center to call in the unlikely event that one of our primary data centers go down or does not respond in a timely manner. Our developer guides can again help with this topic. There you will also find code snippets that demonstrate our best practice failover.
Once this call is set up, all that is left is evaluating the results and displaying the appropriate message back to the end user. While you can go through our developer guides to figure this out, the first important field to examine in the response from the Address Validation International service is the Status field – here is a table of what is expected to be returned:
Address Status
| Name | Description |
| Invalid | For addresses where postal and/or street level data is available, and the street was not found, bad building number, etc. |
| InvalidFormat | For addresses where Postal data is unavailable and only the address format is known. |
| InvalidAmbiguous | For possibly valid addresses that may be correctable, but ultimately failed validation. |
| Valid | For addresses with postal level data that passed validation. |
| ValidInferred | For addresses where potentially far reaching corrections/changes were made to infer the return address. |
| ValidApproximate | For addresses where premise data is unavailable and interpolation was performed, such as Canadian addresses |
| ValidFormat | For addresses where Postal data is unavailable and only the address format is known. |
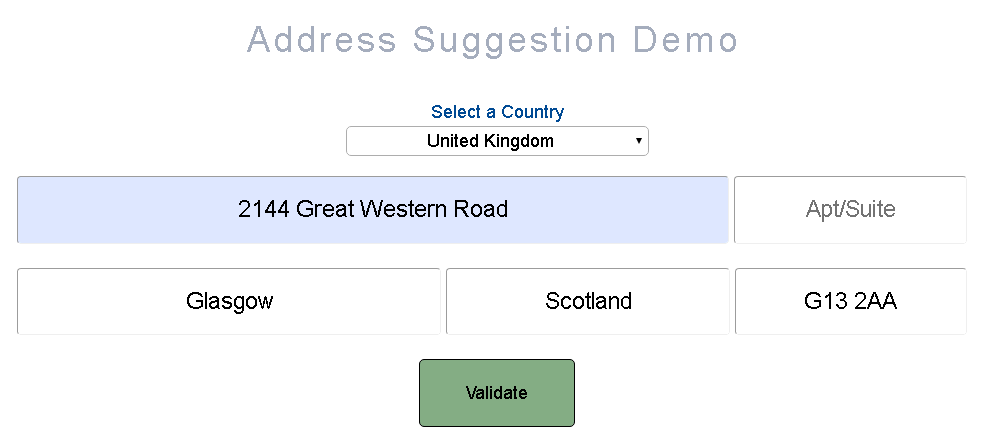
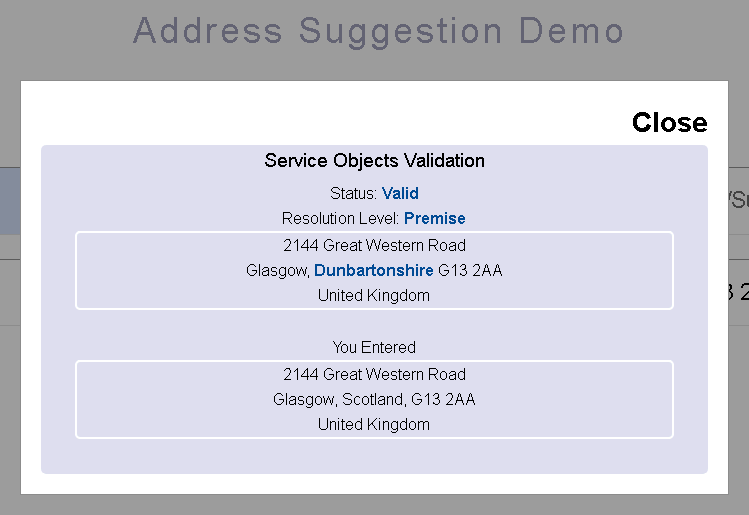
Another important field will be the ResolutionLevel, which can be one of the three following values: Premise, Street and City. The values returned in these two fields will help you make a decision in the code with respect to what exactly you want to display back to the end user. What we do in our demo is display the Status and ResolutionLevel to the end user along with the resulting address. Then we give the user a side-by-side view of both the resulting address just mentioned and the original address the user entered. This way the end user can make a decision based on everything we found. In the case shown here, for example, we updated Scotland to Dunbartonshire and validated to the premise resolution level.
There are many customizations that can be made to this demo, such as the example we mentioned earlier about setting up the bias. Additionally, instead of using the Address Validation International service you could also create an implementation of this demo using our Address Validation US or our Address Validation Canada products.
Want to try this out for yourself? Check out our Address Suggestor video tutorial or contact one of our Account Executives to get the code for this demo – we’ll be glad to help.