C# may very well be our most requested sample code. There is good reason for that too; C# and the .NET framework are many developer’s first choice for creating a web page or any other type of application because of the versatility of the language and framework as well as the robust features that Visual Studio offers. One of those features is the ability to consume a WSDL (Web Services Description Language) and create all the necessary classes and methods to successfully call a web service. This makes using SOAP squeaky clean! Ok, that was the first and last SOAP pun, I promise. Here’s what you will need for this tutorial.
Requirements
- Visual Studio (2015 is used in this tutorial but the process should be relatively similar to any other version)
- DOTS Web Service License Key (We are using DOTS Address Validation International for this example)
- Some familiarity with C# and the .NET Framework. This tutorial will be pretty basic so it should be accessible even if you are a beginner.
Setting up the visual studio project
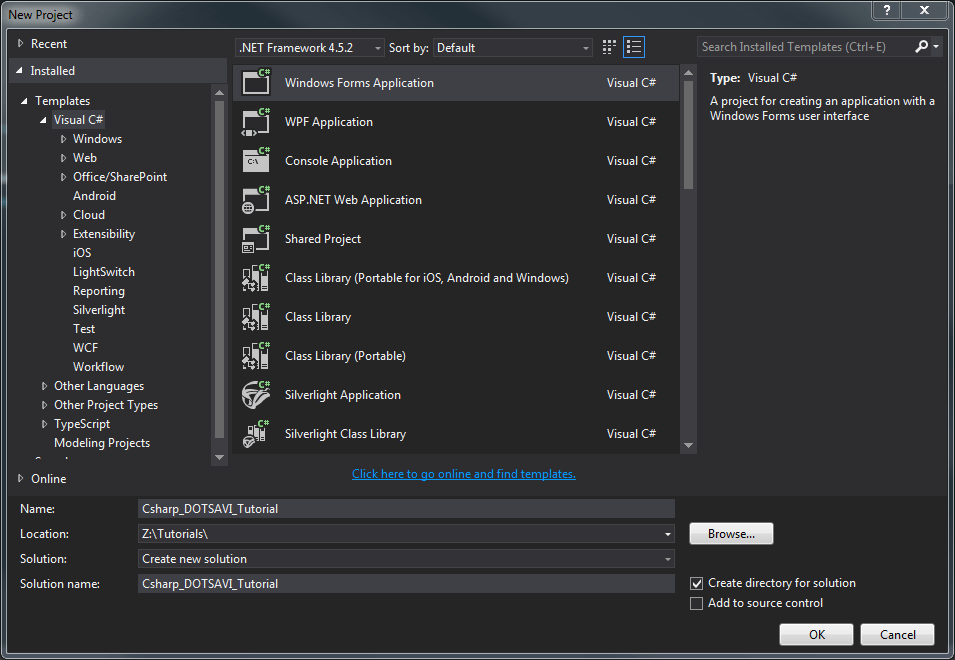
For starters, launch Visual Studio and create a new ASP.NET Web Application and choose an appropriate project name. Your screen should look similar to the following:
Click ok and then select “Empty” to create an empty web form. We will add the necessary aspx page momentarily.
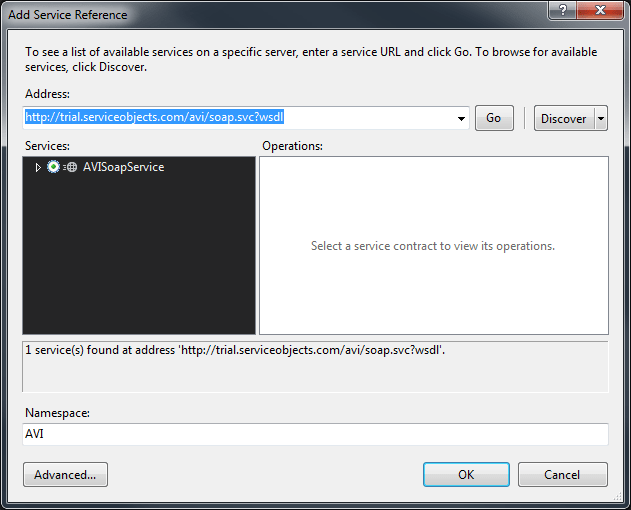
But, our first step for our new project will be to add the service reference to the DOTS Address Validation International web service. To do this, right-click on “References” in the Solution Explorer and select “Add Service Reference” a pop up should appear to add the Service Reference. Here we will add the URL to WSDL that contains the information on how the project should interact with the DOTS Address Validation International web service and we will name the Service Reference.
For reference here is the WSDL URL and here is what the pop-up page should look like
WSDL: https://trial.serviceobjects.com/avi/soap.svc?wsdl
Now that we have successfully added the service reference, we can add an aspx page that will have our input form and display our results. Right-click the project name and select “Add” and then select “Web Form” to add a blank web form to the project. For our example, we’ll name the form “AVIForm”.
Creating the input form and code behind
Now that our form is present, we’ll add some simple HTML and ASP elements to take in our inputs and display them to the screen after we get a response from the service. Make your ASPX page look like the following.
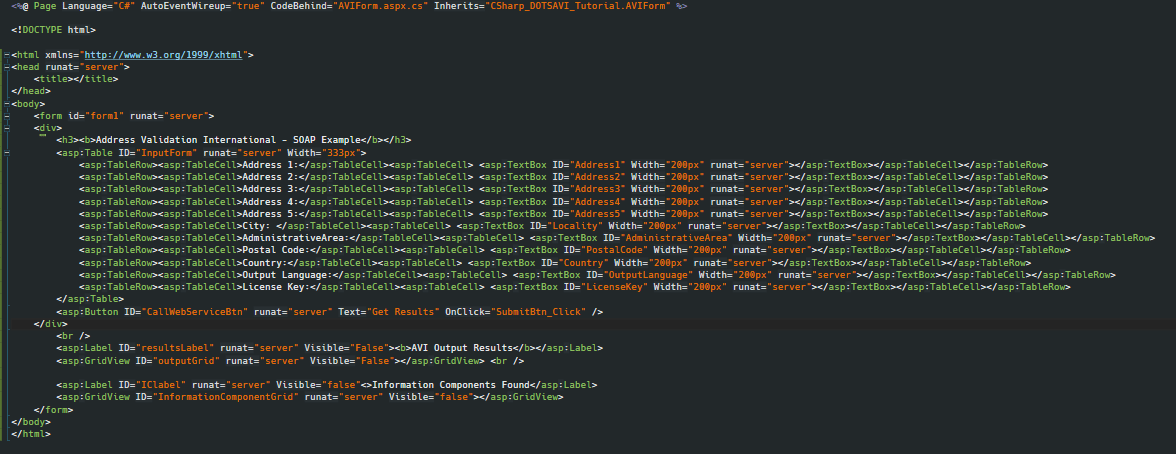
The above code will allow us to take the inputs send them to the code behind and then display the results in the outputGrid and InformationComponentsGrid. We have to separate grids; one to account for the standard outputs from the service, and the other to account for the InformationComponents field to account for some variable information and data to be returned by the service. This field can change based on the country or data available for a specific international address. Now that our input form is all set up, we’ll add the proper code behind that will display the results to the user.
We won’t look at every part of the code here, to download a .txt version of the code, click here.
One thing we like to stress to clients who are integrating our services is proper Failover Configuration. In the unlikely event that our primary datacenters are offline or producing strange errors, we want to ensure that our clients are pointing their code to our backup datacenters so that their applications and business processes go uninterrupted. Here is a full picture of the proper way to integrate failover into an application.
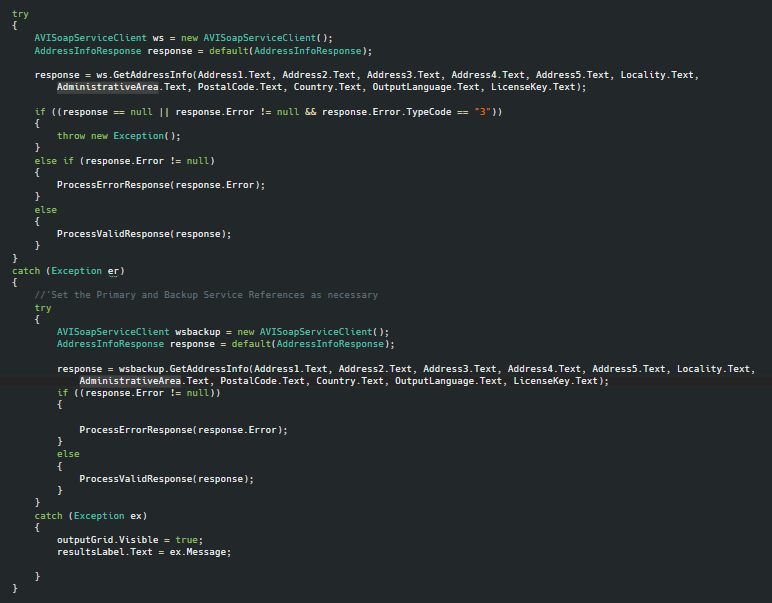
We’ve found that to ensure uninterrupted service the best practice is to have the calls to the web service nested in a try-catch block of code. In our current setup, the backup call will hit the same data center as the primary call; but if a License Key is purchased the primary call should point to sws.serviceobjects.com and the backup call should point swsbackup.serviceobjects.com. The screenshot below highlights some of the primary failover logic that will allow the code to run uninterrupted.

This code occurs right after the primary call to the web service if it detects that the response from the service is null or if an Error TypeCode of “3” is returned, then the code will throw a new exception and the catch statement will call the backup web service call.
If a successful response is received from the service, the code will call a method named “ProcessValidResponse” which takes in the response from the web service and display the results into a DataGrid and then send that data grid to the ASPX page for the user to see. This method is pretty straight forward for the most part, as it simply assigns the outputs and their respective values into separate columns for the user to see.
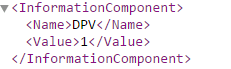
The only part that may be mildly tricky would be the InformationComponents field that is returned from the service. This field is an array of InformationComponent which contains two strings; one for the “Name” of the variable returned and one that indicates the “Value” of the variable returned. For example is you pass a US address into the AVI service, one InformationComponent that can be returned will have a Name of “DPV” and a Value of “1” indicating that it is considered delivered by the USPS. Below is an example of the XML output.
This array of fields allows us to add new outputs to the service over time without potentially breaking any existing client’s code. To account for this array of information we have a brief For loop below that will loop through all the elements of InformationComponents and add their names and values to the InfoCompTable so that they can be seen by the user.

Making a successful call to the service
If we go ahead and run our project, our webpage will look like the following.
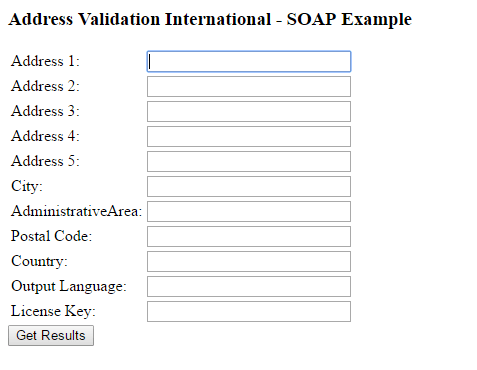
Not very exciting, but it will get the job done. As an example address, we’ll use the following in France:
3 Place de la Victoire, 33000 Bordeaux, France
If this address is sent to the service you should see the following response.
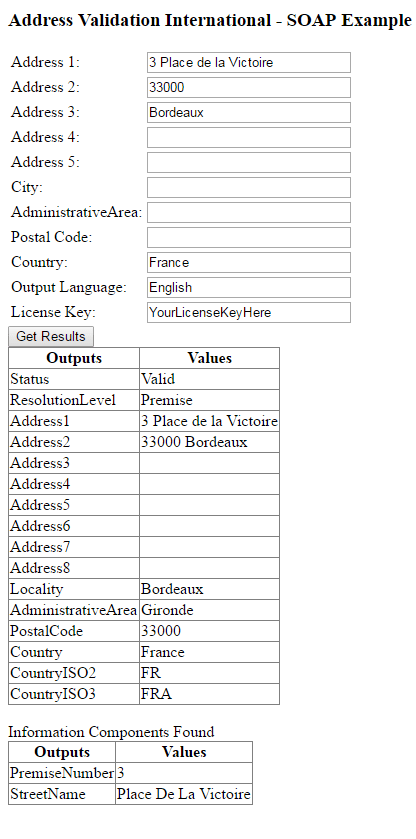
As you can see, this address is considered Valid by the service and the service has a premise level resolution for this address. The Address1-Address8 fields will also display how the address should look for mailing purposes. For this particular example we only need Address1 and Address2 but for other countries, all 8 address lines may be used. The InformationComponents field was also parsed out and the two Name and Value pairs were shown below the standard outputs from the service.
That wraps up our tutorial for DOTS AVI integration in C#. Congratulations! You are now on your way to being a DOTS Address Validation International expert! Feel free to go and test more International addresses, and as always if you have any questions feel free to reach out to us at support@serviceobjects.com!