Welcome to our third installment in our Salesforce Data Quality Tools Integration Series. In the first two parts, we covered creating a plug-in that could be dropped on a flow and a trigger. Today, we are going to jump into creating a VisualForce app that you’ll be able to extend for your purposes. At the end, you will have all the code you’ll need to get started, so don’t worry about implementing this step by step as I have it laid out in this blog.
The goal of this app is to display to a table of contacts that can be selected to have their emails validated. We will add a filter to the table to better target certain emails for validation. We will also display a few charts that will provide a good overview of the state of the emails in their system. These charts will refresh according to the filter selected for the table of contacts.
As always, we are going to start with some basic setup, then switching to look at what the final VisualForce page is going to look like, after that we’ll run through the code. During this walk-through, it should be clear where there are opportunities for customizing this solution.
The very first thing you need to start with is setting up the Service Objects endpoint. I am not going to go over it this time because I go over it in the first and second parts of this series. So, if you need help setting up your endpoint or a description of what this is, please check out the previous blogs. If you have been following along from the first two blogs, then you have already completed this part. Once you have set up your endpoint, you will need to add the following custom fields to the Contact object. If you are customizing this for your own purposes, you will want to add these fields to the object you are working with. If you want to map more of the fields that our service returns, you’ll have to create the appropriate fields on the object, if there isn’t an existing field already at your disposal.
- Field name
- Internal Salesforce name
- Type
- Service Objects field name
- Email Catch All
- EmailCatchAll__c
- Text(20)
- IsCatchAllDomain
- Email Score
- Email_Score__c
- Number(2,0)
- Score
- Email Score Name
- EmailScoreName__c
- Text(20)
- DPVNotesDesc
- Email Top Level Domain
- EmailTopLevelDomain__c
- Text(50)
- TopLevelDomainDescription
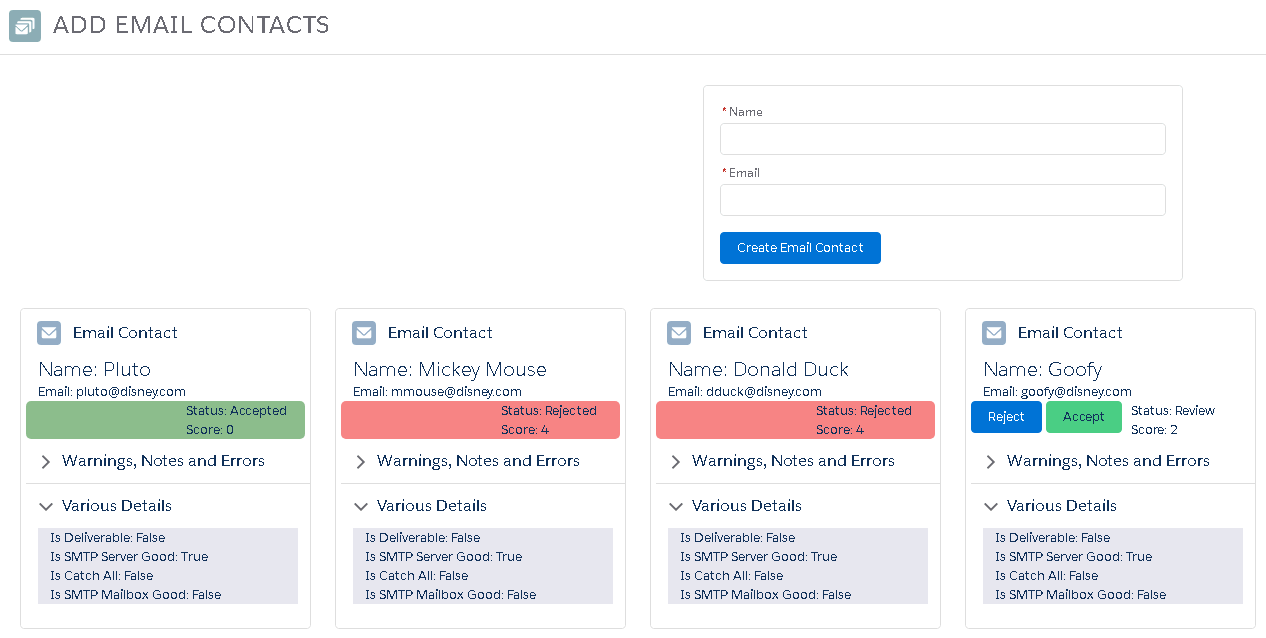
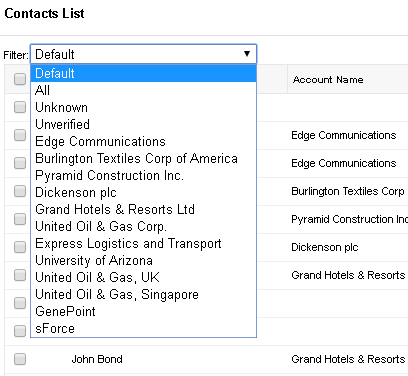
Here is a view of the table with the filter and the Validate button.
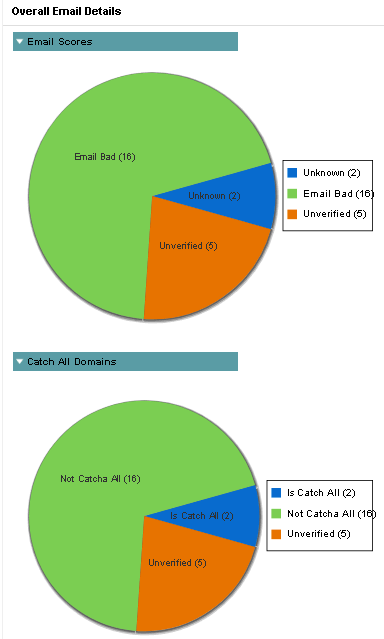
Next is a screen shot of a couple of the charts.
As you can see, it is a pretty simple example that can be tailored to whatever custom solution you are looking for.
For this walk-through, we will be creating three files: one for the markup, one for the controller and one for the web service call.
MARKUP
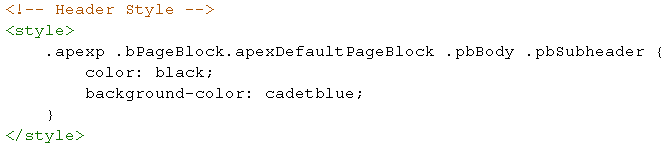
Starting with the markup page, the actual VisualForce page, we will create a file called EmailValidation.vfp. For the first element, the Apex:page element, we define which controller we want to have associated to the page. We will make a custom controller for this app, “ContactEmailValidationController”, which is the name of the class that we will build later in the controller section. After we establish the controller that we are going to use, we override some styles so that we get the headers in the charts to stand out properly.
Next, we create the page block that will house the components to the page inside a form. The four main components are the filter, the table of contacts, the validate button(s) and the charts. You will more than likely want to implement a paging system for the table, so you can page through your contact records but I do not go into that here.
Throughout the code you will see instances of values that come in the form of {! [Some variable name]}. That is simply a reference to a value in our custom controller. In the case of the filter, we have two of those instances, one for the filterId and one for Items. In this case, the filterId is telling the select dropdown list which item is selected. When the page first loads, nothing is selected, so the filterId is empty or null, which will render the default table view. You can certainly set this to have some other default value. The Items variable simply holds all the possible select options for the dropdown list. Items is populated in the controller, which we will take a look at later. Since we want the charts and the table to refresh when the filter is changed, we set the reRender attribute on the actionSupport element to target contacts_list. This is the id of the overarching page block section. Any markup outside of the contacts_list page block section will not be refreshed. The underlying code does an ajax call to refresh just a part of the page, which can be handy when you don’t want the whole page to reload.
In the next section of the markup, we setup the table of contacts and the columns that we will display back to the user. I have collapsed much of the code here so we can first focus on the apex:pageBlockTable element.
There are two things to notice in the page block table element. First, the contacts variable holds all the contacts coming back from the controller. Later, you will see a method on the controller that is called getContacts which is specifically named that way to sync up with this contacts variable. For example, if the variable was called people then the controller would need a method to retrieve those records called getPeople. The second thing to notice is the value cont for var. This value will be the container for each of the contacts in the contacts variable. The format and setup of the page block table element can be described such that it acts like your traditional for each loop. On a side note, there are many ways we could have created this table. For instance, we could have used a repeater or a couple of other elements to display the contacts to the user.
Next, we are going to look at the way we setup the columns and we’ll start with the checkbox column, since it is unique to the rest of them.
This column consists of an apex:facet and a checkbox input. The facet will implement its own checkbox input as well. We use the facet to customize the header of the column with a checkbox. Salesforce defines the facet as this “A placeholder for content that’s rendered in a specific part of the parent component, such as the header or footer of an <apex:dataTable>”. The checkbox in the header will act as the select all/select none functionality of the column. The checkboxes in the rows will be populated with a contact id so we can track which contacts were selected. The onclick functions in both input elements reference JavaScript functions that we will discuss in more detail shortly. Simply put, those functions will manage the storage of selected rows.
The columns I have highlighted with the red boxes are going to be your standard output columns and those outside of the red boxes will need the header label, for the respective columns, updated to be more readable.
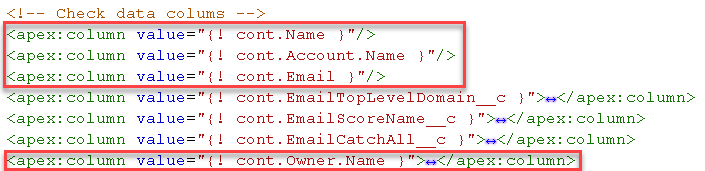
Earlier we created the custom fields to house some of the values that will be coming back from the call to the email validation service. Creating custom fields can, at times, lead to having to create a more “technical” label for the field instead of “displayable”. One obvious reason is so new custom fields do not conflict with existing fields or any future fields. Keeping that in mind, we do not want to use the labels of a couple of our custom fields in the header, so we will update them using the facet like we did earlier for the checkbox header but this time without a checkbox.

In this simple example, we are updating the header text, but the values in the column will still be pulled from the cont.EmailTopLevelDomain__c variable. And that is really it for the columns, pretty straightforward. And easy to extend, with little effort you can alter this example to display any of the columns you want in the table, as long as you have access to them from the controller.
In the next section, we will focus on the pie charts. The sample code will have a chart for Email Scores, Catch All Domains and Top Level Domains. The code becomes redundant, so I will only demonstrate one of them here. With that said, you can add any chart you want that focuses on the particular situation you are solving for. The overarching chart container is a page block element that I titled “Email Details”. This will house the three charts.
Each pie chart is wrapped in a page block section with it’s own unique title. For the apex:chart element, we see the variable EmailScorePieData. That links up to the getEmailScorePieData method on the controller which pulls in a list of wedgeName and count combinations which we can see referenced in the apex:pieSeries element.
Next, we’ll jump into the JavaScript portion of the client code. The JavaScript code on the markup page was designed to handle the checkboxes and compiling a list of ids based on checked/unchecked boxes. I used the code from this source on the internet. My only contribution to the code was to update some of the variable names to match more of what was going on in it. As you can see there is a function for selecting/deselecting one or all checkboxes at a time.
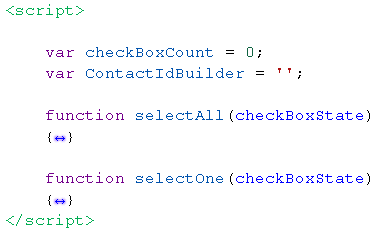
I am not going to take a deep dive into this code, since reading through it should illustrate what is going on there. At this point, all you need to know is that it compiles a list of Contact ids into the ContactIdBuilder variable based on which boxes have been checked as I mentioned earlier.
I did skip over the last part of the markup because it would be easier to make the connection between the ContactIdBuilder variable and the following markup code.
This part of the code, when the Validate button is clicked, it takes the id list stored in ContactIdBuilder and assigns it to the returnString hidden input element. After the value is assigned, the ValidateCheckedEmails method on the controller is called. The returnString value associates to the returnString variable in the controller that we will see shortly. And that is it. That’s all for the user facing part of the code.
CONTROLLER
The controller code consists of two main parts. First, getting data from Salesforce and displaying it to the screen. And the second part is validating the selected rows from the user interface.

Based on the filter selected from the user interface, the getContacts method will return a list of contacts. The main thing that you need to do here is make sure you are pulling back all the fields that the user interface needs to work with, taking into account both the visible and hidden fields. For example, the contact id which is in the background on the checkbox columns.
The method, getItems, retrieves all the filter options for the dropdown list in the user interface. In this method, we put together a list of hardcoded options and then some dynamic options that will allow us to filter on each company in the list.
The three methods that get the data for the charts return a list of EmailData records which are simply key/value pairs. Key being the name of the pie wedge and value being the count or size of the wedge. You can use the pie methods here to copy or modify to suit your own purposes. The more stats you want to present to the user, the more fields you’ll need to retain from the call to our email validation web service. Some of the other fields you may be interested in adding here are, the warning notes, the notes descriptions and/or the SMTP flags (server and mailbox level). There are many other fields that our email validation service returns and you can look at them in more depth here.
The last part of the controller to go over is the call to the method that does the email validate request. The method ValidateCheckedEmails pulls all the contact ids from the returnString variable and sets them up for processing in the CallEV3ByIdList method of the EmailValidationUtil class.
WEB SERVICE CALL
The EmailValidationUtil.apxc is the last file left to discuss. This file does the actual request to the email validation web service. This is the part of the code that you can customize the most; from what you decide to process to what is returned by the service. It is also a good place for any additional logic you may want to implement.
This code should seem very familiar to you if you had read the previous parts of this blog series. It is setup in a very similar way. Just as with the other examples in this blog series, we demonstrate the best practices when it comes to implementing failover. The inputs to the service are the EmailAddress, AllowCorrections, Timeout and Licensekey.
In our example, the email address comes from the contact records selected in the user interface and the rest of the inputs are hardcoded (but they don’t have to be). AllowCorrections accepts true or false. The service will attempt to correct an email address if set to true. Otherwise, the email address will be left unaltered if set to false. Here, I hardcoded it to true but you may want it to be false or use some other business logic to make that determination. The Timeout value specifies how long the service is allowed to wait for all real-time network level checks to finish. Real-time checks consist primarily of DNS and SMTP level verification. Timeout time is in milliseconds. A minimum value of 200ms is required. I have hardcoded it to 2000ms. For the LicenseKey, you will want to either hardcode this into the call (depending on the access that people have to the code) or create a custom object and/or a custom field with the license key that you can lock down with user permission only available to the administrator.

Before I wrap this up I wanted to make mention of writing tests to cover the code. This example is complete but expects you to customize parts of it, so I have not provided any test code. You will want to do that. It will ensure that even as Salesforce updates their system or you make changes to your organization, everything will continue to work as expected.
In conclusion, VisualForce pages are mostly used with the old Salesforce UI the Classic UI, but it can be created in a way so that it will continue to work with the new Lightning experience. In a future blog, I will show a demonstration of how to create a Lightning App while incorporating our validation services. Service Objects has validation services for all kinds of solutions, making Salesforce a perfect platform to demonstrate our services on.