We are back now with the fourth blog in our Salesforce Data Quality Tools Integration Series. In previous blogs, we covered various topics like; creating a plug-in that could be dropped on a flow, a trigger and Apex classes. From these blogs, you can learn how Service Objects APIs will help improve your data quality and in turn, the performance of your Salesforce instance. Like the VisualForce app demonstration, this demo shows how you’ll be able to extend our services for your own purposes in Salesforce’s Lightning framework. By the end of this blog, you’ll have all the code you’ll need to get started, so don’t worry about implementing this step by step.
This Lightning app is going to serve as a quick email contact input and validation tool. We will use separate custom objects and custom fields to make this app stand alone from your other objects in Salesforce. With that said, please note that everything I demonstrate is totally customizable. For the purposes here, that means you can adjust which objects and fields (standard or custom) you want to use. You will also be able to customize the call to our Email Validation API and insert your own business specific logic. There are a lot of code files in this project but do not be discouraged. This only means that the code is broken down into byte size parts and abstracted to keep the logic a UI separate.
First things first, we are going to start with some basic setup. Unlike VisualForce, before we can work with the Lightning framework, we will need to turn on My Domain in Salesforce. You need to have your own sub domain for your Salesforce org, and that is what My Domain does, it allows you to create a custom sub domain. You can find the settings under Company Settings when using the Lightning Experience. This link will take you through the details on setting it up. After you have activated it, you may need to wait several minutes before it is ready. Salesforce will email you when it is done.
The next part of the setup is setting up the Service Objects endpoint. I am not going to go over it this time because I go over it in the first and second parts of this series. So, if you need help with setting this up or want a description of what this is, then I would refer you to those blogs. If you have been following along from the first two blogs, then you would’ve had completed this part already.
In the VisualForce demo, we jumped right into creating the custom fields, however, this time we need first to create the custom object that will house our custom fields. In the Object Manager, click on Create and select Custom Object. From there, you will be prompted to fill in several details of our new custom object. Here is what you will need to add:
- Label
- Email Contact
- Plural Label
- Email Contacts
- Starts with vowel sound
- Check
- Record Name
- Name
- Launch New Custom Tab Wizard after saving this custom object
- Check
That last check for launching the New Custom Tab Wizard will create a custom tab for you to be able to add/edit/delete during testing before we create the final home for our app.
Next, you will need to add the following custom fields to the newly created Email Contact object. If you are customizing this for your own purposes, you will want to add these fields to the object you are working with. If you want to map more of the fields that we return from our service, you’ll have to create the appropriate fields on the object if there isn’t an existing field at your disposal. If you are using existing objects for these fields, you will want to take into consideration the names of the fields, to prevent conflicts or confusion in your system.
- Field name
- Internal Salesforce name
- Type
- Service Objects field name
- Email
- Email__c
- Email (Unique and required)
- EmailAddress
- Status
- Status__c
- Picklist
- Review (Default)
- Accepted
- Rejected
- None
- Score
- Score__c
- Number (1,0)
- Score
- Notes
- Notes__c
- Text (255 and default set to “None”)
- NotesDescription
- Warnings
- Warnings__c
- Text (255 and default set to “None”)
- WarningDescriptions
- Errors
- Errors__c
- Text (255 and default set to “None”)
- Type, Error.Description
- Is Deliverable
- Is_Deliverable__c
- Picklist
- Unknown (Default)
- True
- False
- IsDeliverable
- Is Catch All Domain
- Is_Catch_All_Domain__c
- Picklist
- Unknown (Default)
- True
- False
- IsCatchAllDomain
- Is SMTP Server Good
- Is_SMTP_Server_Good__c
- Picklist
- Unknown (Default)
- True
- False
- IsSMTPServerGood
- Is SMTP Mailbox Good
- Is_SMTP_Mailbox_Good__c
- Picklist
- Unknown (Default)
- True
- False
- IsSMTPMailBoxGood
Ok, so I didn’t promise some of this wasn’t going to be tedious, but at least it wasn’t hard. This time around, we are adding more custom fields with default values and picklists. Do not skip the default values; they are key in some of the ways the code works.
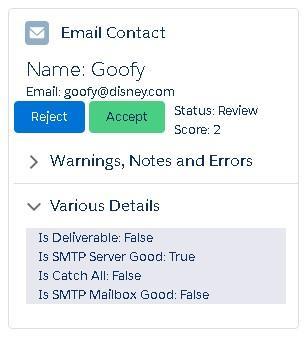
Now that we have that out of the way, let’s take a look at what we are going to build (I fudged some of the values so we could see all states of a validated email on the interface).
Below is a better view of the functionality.
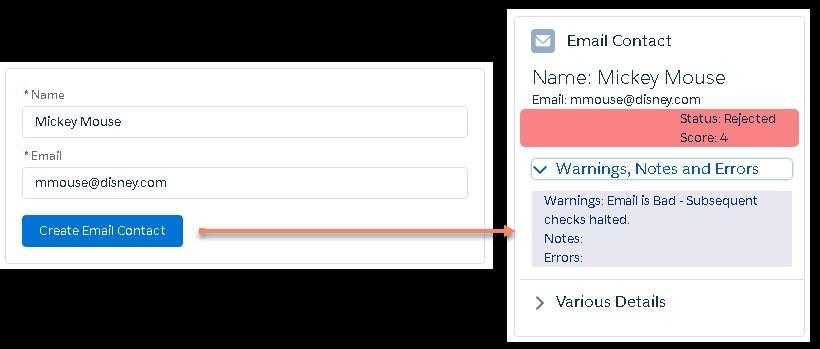
Simply put, we will be building out a UI that with take a name and an email as an input and validate the email against Service Objects’ Email Validation API and display the results to the screen. The validation portion will automatically evaluate the score of the email from the service and assign the appropriate status flag to the record. In our scenario, I decided to let all the emails with scores of 0 and 1 automatically be accepted and all those with scores of 3 and 4 automatically be rejected. The emails that scored 2, I left in the review state for the status field so that the end user can make the final analysis and assign the appropriate status flag.
In order to figure out all the different components we are initially going to need, we will re-examine the layout from above.
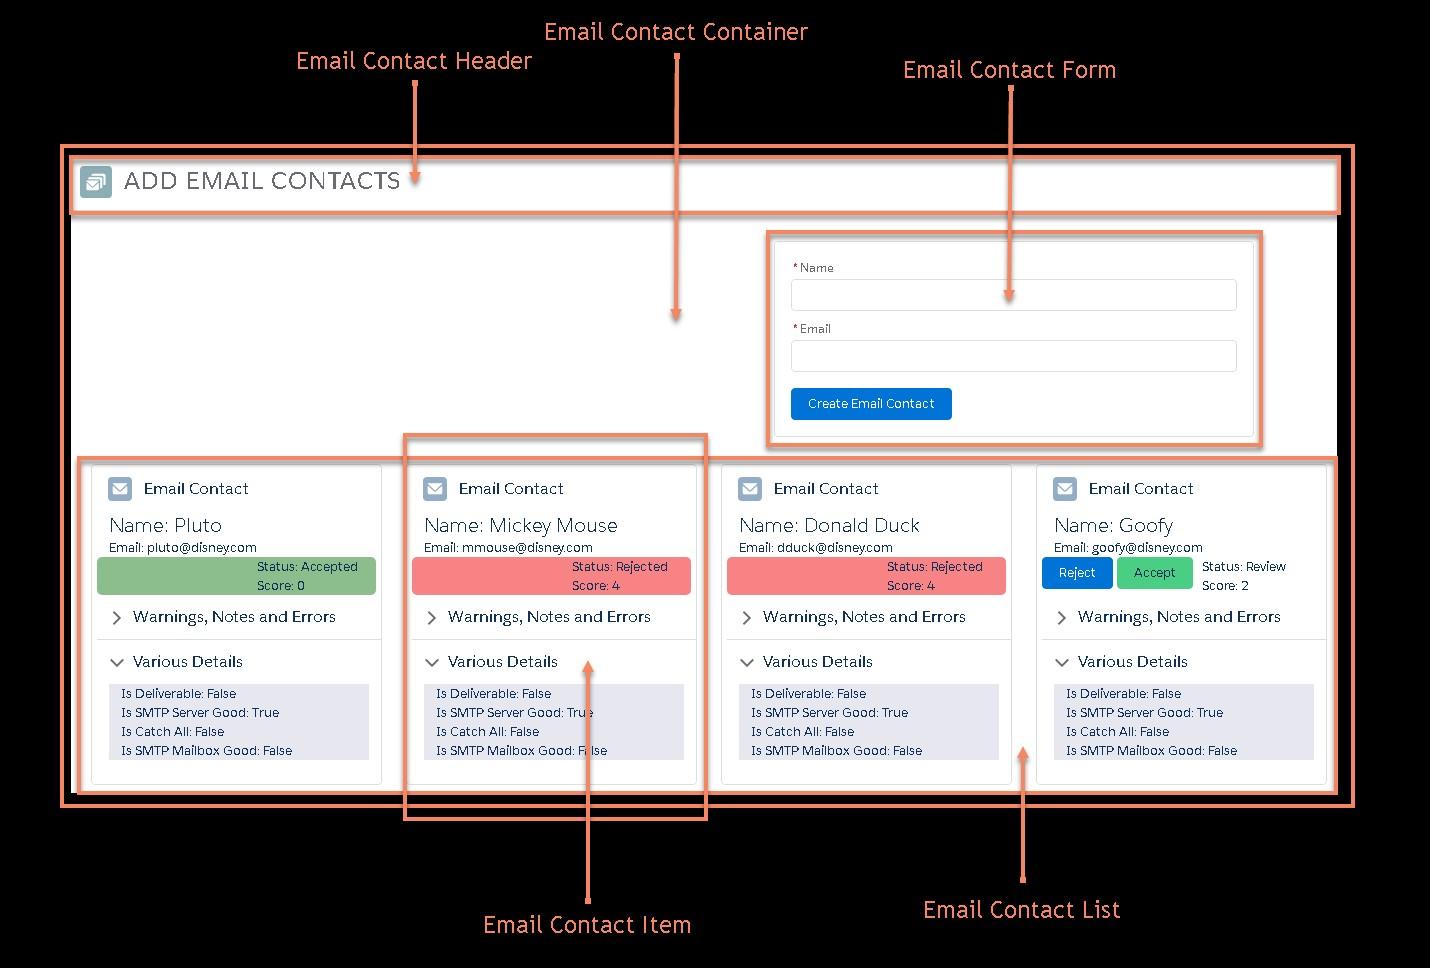
Taking a closer look, there are five parts identified from the UI that need to be created. There are a couple more parts beyond what I have highlighted in the screenshot, but I will get to those as we go. At this point we have identified the following components are needed:
- Email Contact Container
- A place to put all the parts
- Filename
- cmp
- Email Contact Header
- Self explanatory
- Filename
- cmp
- Email Contact Form
- Somewhere to add information
- Filename
- cmp
- Email Contact List
- A place to add the results
- Filename
- cmp
- Email Contact Item
- A single result
- Filename
- cmp
From there, the UI could be broken down into even smaller parts, but for this demo, this is as far as we will need to go. Note, in retrospect, I would have used different filenames that don’t start with “Add” but what is done is done. Next, I am going to go through each of these and briefly talk about the code.
I am actually going to start with a file I didn’t mention above. It is the file that the app will run through: AddEmailContact.app. It is simply three lines of markup that says what resources (slds for styling the page) the page is going to use and an element which is our app container, the AddEmailContactContainer component.
Well, that makes an easy transition to the next page, the AddEmailContactContainer.cmp page. The first thing you will notice is that we assigned the EmailContactUtil as the controller for this component. The EmailContactUtil.apxc is the Apex class file that will act as the server side controller where, in contrast, a page called AddEmailContactContainerController.js will serve as the client side controller for the component. Another important thing to note is the list after “implements.” I am not going to go into it here, but you will need this if you expect to drag and drop this component in the Lightning App Builder in the future. Be sure to set access to global as well.

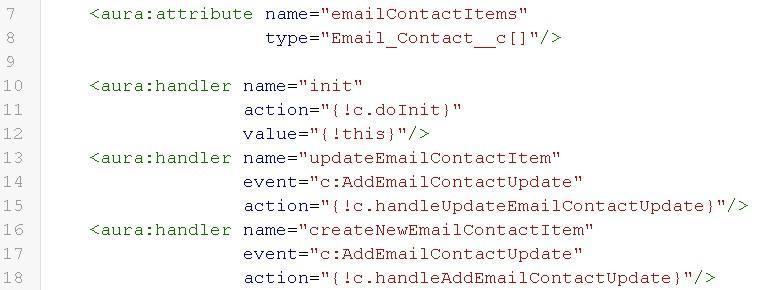
This component takes in a list of EmailContact custom objects in the first attribute element and the list will be used to display the current EmailContact records. After the attribute element, we have three handler elements named init, updateEmailContactItem and createNewEmailContactItem. Those handlers are used for initializing/updating the page (init) and registering two events that will occur later on in the other components. This component will listen for creating a new EmailContactItem and updating an EmailContactItem.
The init handler is important to mention now because it is how the app gets the list of EmailContacts to display. The init handler calls the doInit method in the AddEmailContactContainerController.js page. Asynchronously, the method creates an action to call the server side controller to pull back the needed records. It makes sense that we are calling the server side controller since we need to be retrieving stored records. So this method makes a call to the getEmailContacts method on the server side controller and creates a callback that will update our emailContactItems attribute on the main controller so that we can display the records found.
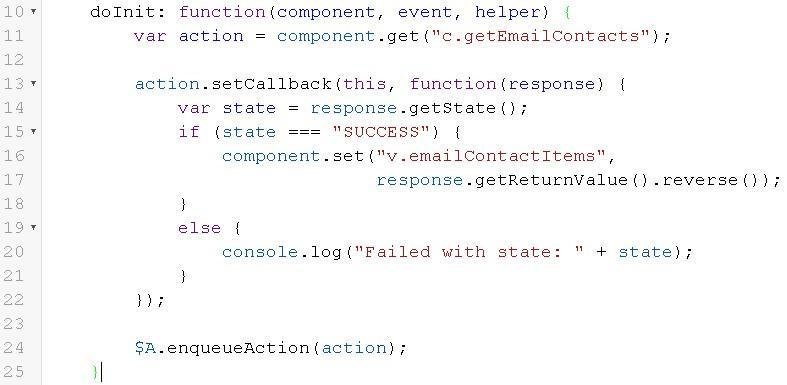
This process will be called on the page being loaded initially and whenever there is some sort of post back, which is useful since we want to display the latest list when new items are added. And that’s it for the init functionality.
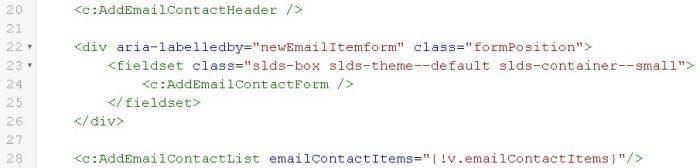
I mentioned the two controller files earlier, but there is one more file associated to the AddEmailContactContainer component, a helper file called AddEmailContactContainerHelper.js. I will run through these associated files later. The remainder of this markup page simply references the other components that this page is composed of: AddEmailContactHeader, AddEmailContactForm, and AddEmailContactList. The AddEmailContactList component takes the input list from this page as a parameter as we will see coming up.
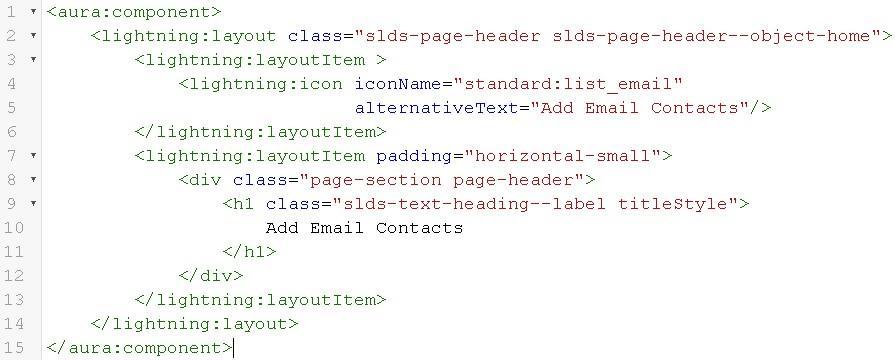
Next, I will quickly run through the header page. There really is not much to it. Besides some out of the box styling and accessing an icon from the Salesforce predefined set of icons, it is not much more than a title. Which makes sense since this is a simple header component.
The AddEmailContactForm is a simple form component. The parts of this page are the attribute or parameter that we will save the input data, registering an event and the form input section itself. The attribute will be the variable that holds the input data and will be of the EmailContact type even though we are only populating the Name and Email portions of the object.

Next, we register the event that this component will be firing off whenever the button is clicked. This is the same event that the AddEmailContactContainer component was set to listen for and to handle.

Events need an event file, something that I would describe more as a signature for the event. It’s a very basic file, so I am going to pop in and out of it quickly. It is defined within the event element and has an attribute defined with a type, which is our EmailContact object, and a name.

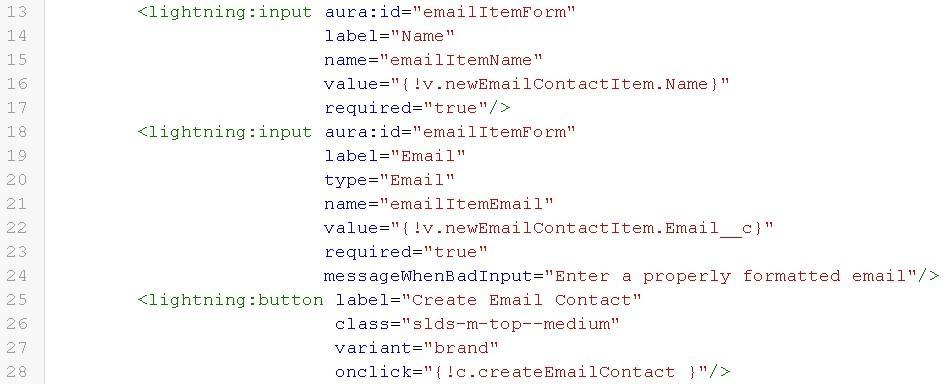
Now back to the form file. The form section will have input areas for the Name and Email of the contact followed by a button to submit the entry to the system. In this case, both inputs are required and will provide errors when they are missing or if the email is not in the proper email format. This component also has a controller and a helper file, AddEmailContactFormController.js and AddEmailContactFormHelper.js respectively. Both files are there to do basic form validation, help setup and fire the button click event and clear the form.
AddEmailContactFormController first checks to see if the inputs to the form had basic validity. You’ll notice that the inputs in the form had the same aura:id, which is allowing us, at this point, to pull all of the inputs back at once in an array. Upon the inputs being valid, we pull the newEmailContactItem variable that was populated with the inputs and send it off to the helper page.
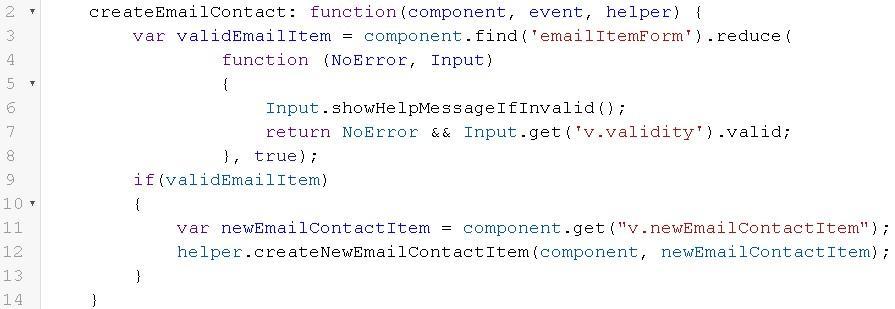
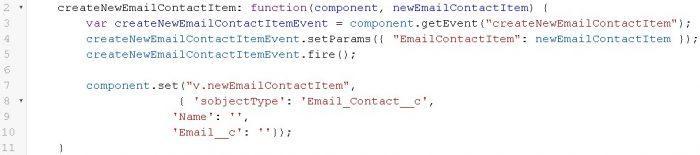
The helper file instantiates the event and sets the parameter for it, which, in this case, is the newEmailContactItem. Then the event is fired, and the input attribute that fills the form is reset to make the form ready to take in more contacts from the user.
In order to continue with the flow of what is happening with the event, I am going to jump back to the main component and look at its controller and the helper files. At this point, the user has entered data in the form, clicked the button and the code has setup and fired the event. Now, the AddEmailContactContainer takes over because it has been listening for this event and is ready to handle it with the createNewEmailContactItem handler mentioned earlier. The action on the handler is to pass control to the handleAddEmailContactUpdate method in the client side controller. AddEmailContactContainerController, which pulls in the EmailContact variable from the event that was fired, sends the EmailContact variable off to the addEmailContact method in the helper file.

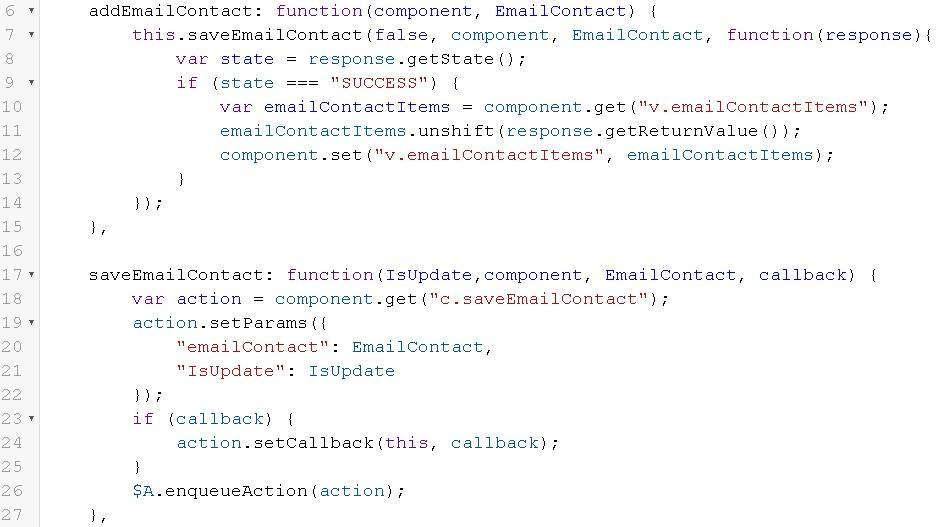
Now on to the AddEmailContactContainerHelper.js file. This app is going to both create email contacts and update them. Since updating and creating are very similar in our scenario, we will have both update and create functions call the one save function. Much of the code is the same, so it makes sense to reuse code here. Since we are following the path of the create event, we will look at it from that perspective here. The two methods we will run through are the addEmailContact method and the saveEmailContact method. The addEmailContact method immediately calls the saveEmailContact method, but it provides parameters for indicating if we are doing an update or create and it also supplies a callback function. The callback gets the list of new records and sends them to the AddEmailContactContainer after the new EmailContact record is created. The new Email Contact record is created in the server side controller and is called from the saveEmailContact method.
And that completes the code flow of creating a new Email Contact record. Next, I am going to jump into the last portion of the code, and that starts with the AddEmailContactList component, where we will look at the displaying of the Email Contact items and the event to update the Status field when there is a button click.
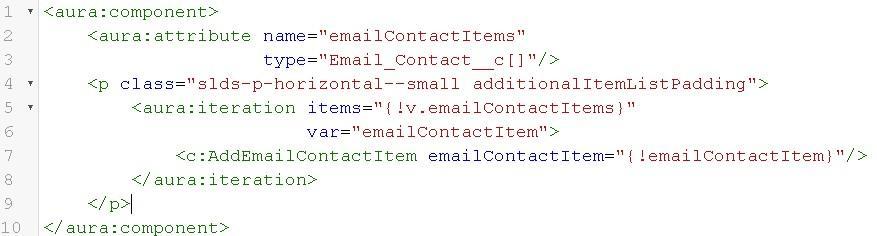
The AddEmailContactList component is another simple and straight forward page. It handles displaying the list of Email Contacts sent to it through the emailContactItems attribute. The code iterates over the emailContactItems attribute dynamically displaying the AddEmailContactItem to the screen.
Moving to the AddEmailContactItem, we see that it is a little longer than the reset of the code but in its parts, it is still pretty straightforward. So what are the parts? We see there is a graphic and a title, a couple of fields, some buttons, a status and, finally, some fine details. We could have broken this out into smaller components, but for this demo, this is enough.
In the code two things happen before the header markup is added. First, just like the event we registered for the button that adds a new contact, we need to register an event for the buttons specific to each EmailContactItem on the page. The purpose of these buttons will be to allow the user to accept or reject an email based on the information from the Service Objects Email Validation API operation. The buttons should not be visible unless the score returned from the service is 2. Scores of 0 are no-brainers, we can, without hesitation, mark those as accepted. Those are valid emails. A score of 1 has a very high certainty to be valid, so we will also automatically set their status as accepted. Those with a score of 4 are bad emails, again, we automate these, but this time we set the status to be rejected. And 3’s are near certainty that they are bad emails, so those are also automatically marked as bad. The grey area is those that get validated with a score of 2. This score represents unknown for various reasons, and we suggest some kind of manual review or inspection. For more information about the score field and deeper details about service, you can check out our developer guides here. After we register the event, we setup the attribute element, creating a local variable input that takes a single EmailContactItem. This should be familiar by now based on some of the other pages we discussed.

Now we get to the graphic/icon and title code. Nothing too interesting here really, so I am going to skip over it. But I do want to mention; this code will display our item icon and the title, you will notice that it actually houses the item parts. All of the rest of the items components will go in here. If you want to change the icon, you can see a list of what is available at this link.

The next bit of code does several things. First, it displays the contact name and the associated email. Then, based on the score determined by Service Objects’ Email Validation operation, we will, in the markup, decide if we should display the buttons used for accepting or rejecting the email address.

Next, a similar markup and logic is used to determine the background color on the status and score sections.
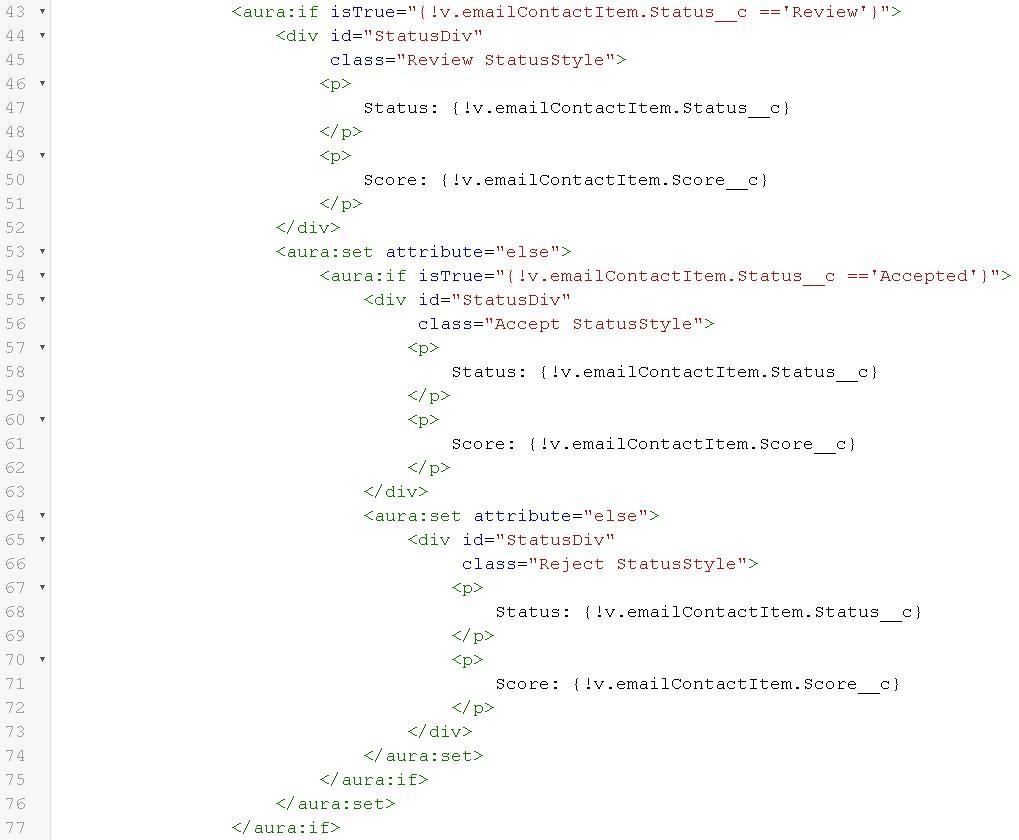
There are several techniques to do this dynamic display instead of using the if/else markup elements but I just learned about them, and I wanted to give them a shot. I would have probably used a different solution involving Javascript, and this code would have been much shorter.
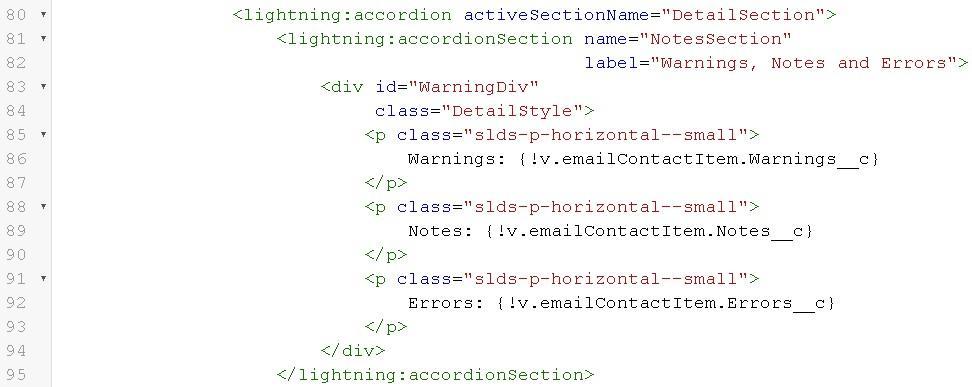
The last part of this component is the Lightning accordion section. I added a two-part accordion, so I had a place to display some details that came back from the Email Validation operation without consuming too much space on the screen. I have it default to opening the second section of the according first. The first part contains the warnings, notes and/or errors.
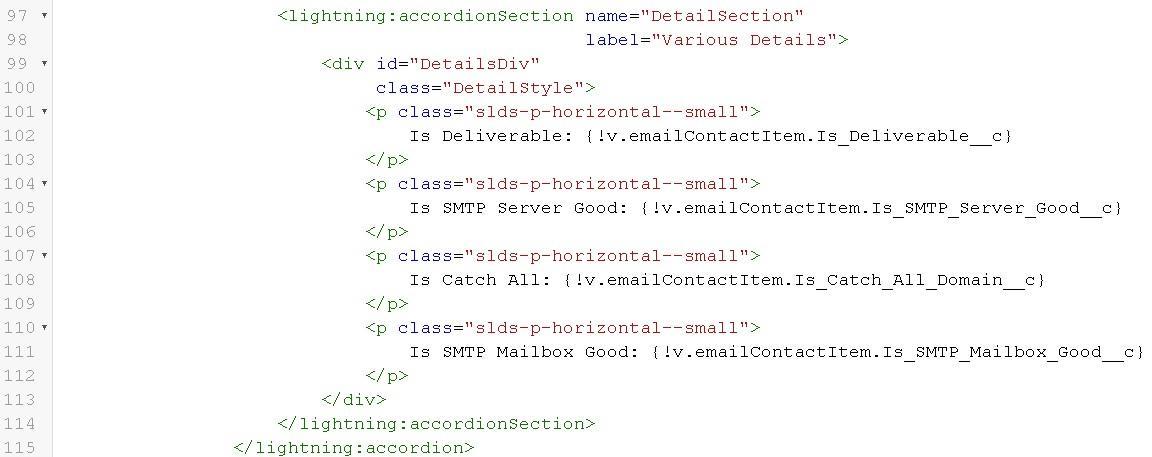
The second part contains other various details like if the email is deliverable or is the email on a catch-all domain, as well as, is the SMTP Mailbox good or is the SMTP Server good. If you wanted to adjust the code and display more data returned from the Email Validation operation, I would recommend adding those fields to these sections or adding more accordion sections with more fields to display. This is the code for the second section.
That does it for the markup pages. Now, let’s just follow through the code for when either one of the buttons is clicked. The rest of the functionality rests on the controller and helper of the AddEmailContactItem page but also some of the pages we already went through from the first event we discussed.
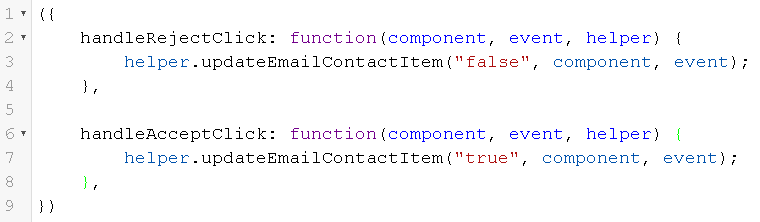
The accept and reject buttons each have their own method they call when clicked. I could have used just one method here and checked the name or id of the calling event, but I thought this would keep things clear. These are really just pass-through methods that indicate if the accept or reject button was clicked by passing the true or false to the updateEmailContactItem method in the helper file.
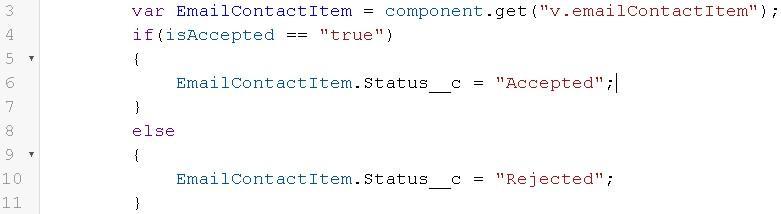
In the AddEmailContactItemHelper.js file, the method updateEmailContactItem starts by setting the status field for the contact item based on the input parameter.
Once that is set, we create the event, fire it and hide the buttons from the screen.

You may have noticed that we are not creating a new event file. Since the signature for the create and update events are the same, we are able to reuse the one we already have. Now, like before, the AddEmailContactContainer is listening for the event, but this time it is listening for the update event. When the event is fired, the main controller will catch the event and call the handleUpdateEmailContactUpdate method in the AddEmailContactContainerController. The handleUpdateEmailContactUpdate method pulls out the EmailContactItem that was passed in the event and sends it along to the updateEmailContact method in the helper.

Earlier, when we were running through the create functionality, we came to a point where we wrote one save method because we knew that the save method could server both the save and update purposes. Now we get to utilize what we setup earlier and piggyback off of the save code. In the AddEmailContactContainerHelper the method for updating, the updateEmailContact method, will call our saveEmailContact from before but this time we are not sending along a call back method. The saveEmailContact method then sets up a couple of parameters and calls the saveEmailContact on the server side controller, and that controller saves or updates the record.
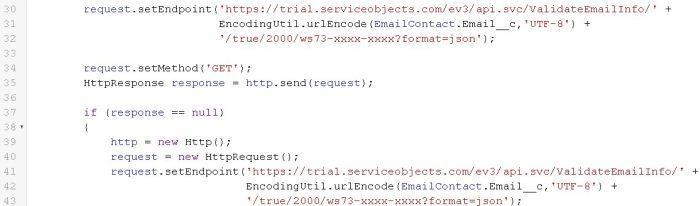
Now that we have gone over all the code you can see that none of this is terribly difficult to understand, but there are a lot of files for a simple app. We could have reduced the file count if we put all the helper code back up into the controller code. We also could have reduced the number if we created fewer components and grouped everything together. And though you can do all that, there are reasons I didn’t. One reason to break the application out this way is so that we can focus on smaller parts and make each page more basic. Another reason is that as you extend this solution to meet your own requirements you may be adding a lot more code and keeping the code compartmentalized like this will help with code readability and maintenance. When you look at the files for this project, you will see that there were several CSS files that we didn’t go over here. You can review those as you see fit. Another thing that I didn’t do, is add more error checking which you will certainly want to do, as well as, writing your own unit tests. The last thing you need to make sure of, is to get a license key (live or trial) from us and add it to the EmailContactUtil.apxc file, otherwise you will not be able to validate email addresses against our API. If you get a trial key, you need only update the key in the code. However, if you get a live key, then you will want to update the endpoints in the code in addition to the key. With the live key, you will want the first endpoint to be sws.serviceobjects.com and the second to be swsbackup.serviceobjects.com. In the example below, I changed the key to contain X’s instead of real values.
So, where do you go from here? One thing you will likely want to do is customize the solution. Maybe your want to incorporate some of the standard objects in Salesforce or perhaps you want to use or create your own custom objects. Maybe there is additional business logic that you want to apply to the results our Email Validation. After that, you will likely be adding this component to a Lightning app. Or maybe you’ll just use the code for the Email Validation alone for something completely different. A side note to make here is that you can even apply this demonstration to many of our other services like Address Validation, Address Detective, Lead Validation, Name Validation and more. When you look at this solution, you should notice that though the part of the code that dealt with calling our Email Validation API was very short, it had a huge impact on the utility of the app. If you want some specific code that can help with this solution or applying this solution to our other services then simply reach out, and we’ll do our best to accommodate.